B1 first submission reflection
The realisation
I think that my first B1 submission was really poor. I feel that I could have done a lot better with my time management and my time restraints. For the most part, I passed my project. I got 4 out of 5 passes, which isn’t terrible, but it’s not what I can do. I would have loved to have finished submitting and get merits across the board with minimum a few distinctions. But. I did not.
This was more of a wake up call to me and a mind game, I knew I wanted to do better and I knew I could do better I just needed to convince myself to do it. This was the hardest part for me personally, I admit that I am terrible at time management and doing the work on time, its something that I have struggled with my whole life throughout all of the work that I do and I know I need to change it.
The lead up
In the lead up to this project, I was too overconfident, I thought because I was doing something different I would easily get the grades I wanted. This was (of course) false.
Brief
For B1, I need to Show my Professional practice, this entails me using professional languages when speaking to people and tutors, it involves me using the resources I have and to use my voice when I have a problem that needs to be solved. This can be shown the best with my team’s messages so when I am communicating with the tutors it can be known that I am using the most professional language that I physically can. Another part of professional practice is that I need to, make sure everything that I submit is in an easy place to see and be overviewed, this will be done on the preexisting Miro board (given to me by the tutor which I have already set up to be the most professional looking I physically can be). I should also be making a Kanban, Gantt chart and an overall look at all my deadlines for the project and when they need to be handed in by. This will also show my progress on how far I am for some of the dates and for when they need to be handed in by, these which I have already set up and will be monitoring throughout the project so I can meet deadline dates and be on time. For the other part of professional practice I need to follow proper industry pipelines and follow everything through the proper way that I should do it which means that I need to have some initial designs for everything and make sure that I show my work the whole way through. This entails me showing everything that I do down to the file format that I use, I need to make sure that everything is correct and I’m following the correct development pipeline. Also, using my knowledge to fix mistakes that I make along the way which will also be logged onto my development diary files.
The next part of the project is Career progression which decides what I need to do with my career path in the future, for this I will need to research different parts of the career path that I want to choose. I will need to look into what I will need to continue down this path, this involves me looking into universities and different things that I can do after university e.g. getting an Apprenticeship. I will also need to look into future employers and employee which are hiring and when they are hiring so I can know when to submit my applications and start the process of getting hired. To further this more I will need to look into the skills that I need for the role and judge myself if I am fit for this role and roles that I apply for. I should also look into the specific tasks I will be doing so I can pick and choose what I will need to expand on to try and push myself to further employers, this will generally help my overall appeal to a lot of different companies instead of being dead set on one final company. However, this doesn’t mean that I shouldn’t focus on one aspect, if I want to be pushed out further then I need to appeal to everyone. So for this to work I need to be extraordinary at one specific part. Let’s say programming. This will allow me to be mediocre at everything else which looks better than being good at everything. It shows potential employers what I can be used for in the company and what else I can be used for inside of the company.
Next up is Career plan, this plan is what I’m doing now, to where I can be in 1 – 10 years, this is the plan that sets in stone what ideas I want to do and create I need to this about a variety of things including my Quality of work, my experiences and most of all my teamwork and technical skills. These will help me for when I need to think about what path I am going to go down as when I am looking into employment, I will know exactly what I need to show my employer to meet their standards of work and skills to show off. I must clearly say everything that I want to do in which order that I want to do it and show off every step off the way to further my appeal. When choosing my career path I must also show them my extensive portfolio, which has everything that I have ever done work wise from it, It will show work I have done at home, University and college. Which overall can impress employers especially when the work is done at home, it proves my ambition and my love for the overall role in the company, it may also show off my teamwork experience’s and my past experiences with work. I must even talk about my future in this and show them where I would like to be in the company or even in another company, I must show them the roles that I would like to take on and the ways I can overcome the challenges that will face me.
Thirdly, is the supporting documents section, these documents must include. A CV, which is a document of all my past work experiences and my results in all my exams, they must be professionally laid out and show in an orderly manner for easy reading, they must also show which employment I am looking for and what position is the said company that I would like to take on. Next up, is my personal statement which will be a hand written statement by me which will show all of my higher education and higher qualifications along with it, I will spend time making this the physically most professional piece of written work that I do. Which I will show to people as I need to show the potential employer which higher education I have without taking too much time to read which could potentially bore the employer. After this I will need to submit my Portfolio, which is a documentation of all the work that I have done over the course of the time that I have been looking for jobs, it can show my past work and some private projects that I have done in my own time. This may be as extensive as I need it to be as I need to show them that I can do work fast and efficiently and within my own time. It will show my passion for the work that I am doing and how it will affect my state in the company. For the final supporting document I need to show my Personal branding, this must include a personal logo for me as a specific person which will be displayed on my portfolio and it will show me as a business. I must also show a single style across all my different projects and pieces of work that I do, this will show which piece of work I am the best at and what I can do, it must be clear which style I am trying to show and how I am going to do it. Finally, it has to be professional as possible, I must show everything clearly and professionally to optimise how good my work looks as if I make it as neat and professional as I can it will display my work ethics and how good I am at making my work professionally accurate.
Fourthly, I will need an Artefact for this I need to produce some technical work for my portfolio this will involve me making anything with my skills, and placing it onto my portfolio. This must be a relatively small piece of work that can be easily skimmed over which will be small in comparison to other parts of my portfolio. However the quality needs to be the same standard as it is important to remember professionalism and how much I need to try for each individual piece of my work. As I will be making it small the project size itself will be too which can be shown off easily.
And finally, I will need Postproduction, this is appropriate for whichever type of artefact that I chose to make for example my code will need to be easily accessible and viewable for people to look at with ease, it should also show my own personal branding and include a logo so I can display that it is in fact my work. I should also receive feedback from my peers about my artefact and how it looks and runs. They should base it off things that I need to change and things that they feel that its missing, I should try to keep the read time at a minimum and make notes small and precise for easy viewing. Everything that I do with this should be shown and recorded in a development diary which will be shown as well, I will also highlight my mistakes and how I fixed them to let people know that I did not do it perfectly, but I corrected it instantly.
Career progression
The usual career progression for a base level programmer will involve someone at least going to university to study at least something about programming or to do with games development in a coding language. This is always mandatory. EXCEPT. For when someone could go to do an apprenticeship. If the person has been to an apprenticeship. Then they could still be offered a place as they will have a little bit of experience in the field, obviously not as much as someone who has been to university, but it will 100% increase their chances of getting at least a base level placement. As soon as someone makes it out of university and or an apprenticeship and they begin to look for a job. They will more than likely end up with an entry level development position. Even after all the training that they have had they will still need a lot of supervision and training before even starting to work or progress in the career. Some of the base tasks of an entry level programmer involve debugging. and writing smaller lines of code. Most of which will be quite simple and involve little to no work to do. They will also (depending on the company) be under extremely strict supervision due to if they make one small mistake it can mess everything up. Additionally, they could be testing whatever they are working on which could provide good evidence and show decent work ethic in the company. Which could even further make them more dependable and increase their chance of promotion.
The next position in the programming career would be a junior developer. This role can also be achieved straight from university. However, it is rather unlikely that this would happen due to the fact that a lot of people that are recently leaving University do not have the knowledge and firsthand experience as a high-level programmer would do. However, if this did happen then this is what a junior level programmer should be expected to be able to do. They should be firstly able to comfortably write code in few languages. They should also be able to check this code that they write. and be able to find mistakes additionally fix them with relative ease. By this point the junior should have a preferred programming language. and should already be learning a second or even third to further extend their knowledge. Additionally, they should also be able to know what type of programming you prefer, this could either be front-end or back-end development. Junior developers should also have a good knowledge of software applications and the development life cycle of whatever they are working on. They should also be at the stage of programming which they can complete most code with little to no supervision at all. However, newer juniors may still need a little supervision to get by the first few months to years of programming. The next job opportunity in the programming industry would be a software developer. At this stage in your work, you should be able to read and write multiple coding languages with ease and be able to learn new ones at a decent rate. This position is 100% not attainable the second you leave University or an apprenticeship. You may start to mentor juniors and entry level developers depending on your skill set and your overall knowledge of programming, you may also be responsible for a small team of juniors and entry level programmers if you have good leadership characteristics however this may not always be the case. You may also be writing more complex code and reading and changing the code of others, this can depend on what you would like in the company and certain companies have different policies. You should also be able to confidently explain the development life cycle and be able to explain software development to everyone. For a lot of people this is the ceiling for programming, and most will not exceed this position this is 100% up to the person and what they would like in the company.
However, if you would like to continue down the path of programming and further extend your job then you can go more down the management possibility for programming, only a select few people make it this far. The next role would be a Senior developer, this development role has more experience in coding and a better understanding of how a lot of code that they write works. They may also oversee the roles under them and further their knowledge of certain languages. They may also take responsibility for certain projects and oversee other developers which they can assist to help climb the same ladder that they did. This is usually the first leadership position that a developer may take on and can lead to even further management positions in the future. Some organisations may skip this role and fit it in with software developers team which could change. This would be down to the organisation’s size and its hierarchy structure. However the main thing is that this role should have is higher power and responsibility then other roles before. One of the final roles in programming and development is, the Development team lead, this role may oversee a higher amount of people and can even look after a group of senior developers. At this stage you should be able to manage higher level projects and talk to stakeholders. Allocate responsibility to lower-level programmers, and assign projects to seniors and software developers. At this point in your career you should be easily leading people and teams and have a deep understanding of leadership. You may also be able to promote and hire lower-level employees, even further you may be able to relocate juniors and entry level employees.
The final stage of development is an even higher management position, this position goes by the CTO (chief technology officer) this is a senior position which oversees most of the organisation’s technical work. Not every organisation has a CTO mostly because the smaller companies are not big enough to have that much work to manage. The CTO may consider the companies use of technology and make decisions to align long term goals with deadlines that must be met. They may also create strategic plans that align with the senior executives of the company. They can also oversee setting a company technological architecture and can look at work from external partners of the company. They can appoint managers and create performance targets. These are all the jobs that can come from one University degree. A high understanding of code and knowledge of development.
For me personally, I would like to try and become a software developer as I feel that this is the best fit for me since I don’t want to take on a management position in a company and I’d like to write more code and be in the practical side of the company. However, maybe when I get older, I could take on this position and train the lower levels of staff. Hire new employees in the company I am working for. I am also aware that I will need to go through all the various stages in the company, finishing University starting as a low-end programmer and making my way up the chain in the company I chose. I know that it is going to take me countless years to progress that far in the company however I feel that I have the right knowledge to make that happen.
Job Listings
For the first job listing that I’m going to be looking at. I’d like to start with an entry-level programmer. This is someone who has just left university and within this paragraph I’m going to break down everything about 2 real life job examples.
This job listing shows me everything that I need to know about this position and what would be required of me when applying for this job role. They list things like the salary of the job. The degree level you will need and the work expectancy, all things that are very helpful to know when applying.
To begin, this job is located in Cheshire. With an expected annual salary of £35,000 - £40,000 which they say is based upon experience. This job is a full time 37.5 hour a week permanent position. After further looking into this position, I can comfortably say a lot more about this position. To start, this listing is made by ‘Guardian Controls International Ltd’ which is an electronics company that specialises in the development of energy efficient controls and solutions for the refrigerator industry in the UK. They are a growing and expanding company so jumping on this job offer would be endlessly beneficial to someone looking to gain experience and further opportunities. If you attain this position, you will be taking orders from the ‘Lead Developer’ and your initial areas of work will include:
- Mobile optimisation
- Bug fixes to Minor problems in code
- Improvements to edge device handling
- Documentation
- Client Knowledgeable development
- Assisting the ‘Lead Developer’ as they request
After further viewing, they also say what skills and experience should be needed and required of you. They then expand on this later down the page. However, they only ask these things of you:
- Knowledge on React and TypeScript
- Knowledge on AWS(Amazon Web Services) and or other similar
- Basic Python scripting
- Git and or version control systems
- Exposure to industry standard softwares (ModBus, Etc.)
Then even further down the listing they state that they would like you to have 1 - 2 years of commercial and or practical cloud development experiences. An additional interest and or understanding of electronic controls, with you also needing to be able to show good attitude and a positive work ethic as a mandatory(something you will see on other Job listings as it should be a basic thing that people should know when coming into a professional work experience). Furthering down the page you can see the ‘working arrangement’ section of wording which shows all of the accessible options that they have available for people to work in. They start with:
- Hybrid working 2 days in office 3 days at home (OPTIONAL)
- Location - Cheshire, CW11 2UD
- Working hours: Monday - Friday (9am - 5am)
- Working hour flexibility(international standards)
- Probationary period(6 months after start) which then leads into permanent position
Now, looking into the final part of this whole page I can see that they have another detailed section about why I should apply to this line of work and the specific company. They start with listing the main points of:
- Company pension scheme
- Bonus scheme
- 25 (PAID) Holiday with public holiday
- The opportunity to join a rapidly growing company
- The opportunity to join a hard working community
- The opportunity to showcase your hard work and skills to a professional environment
- The opportunity to join and become a valued member of a small team of hard workers
After looking at all of these facts and all of the small things that this company offer. This is 100% the type of place that a junior would love to start at, even myself looking at this offer now it entices me to apply as it is something that I am actually interested in. Plus, this is somewhere that looks like it has some really good potential to be a good company due to the fact that it is basing most of its technology from some actual world problems that we have today. That alone can change someone’s mind when making the decision of purchasing something like this and it can affect the selling point of a refrigerator. Overall, looking into this small growing company has shown me the good side of junior development and it has enhanced my view on how a lot of teams and smaller companies work and display their work ethic.
For the second job listing that I’m going to be going over. I wanted to do something a little higher-up than before. This role is called ‘Senior Developer’ and this may be achieved after multiple years in the industry and is somewhere that every programmer would love to end up one day.
After looking into this job listing I have found out so much about this listing and role in the company that I have specifically chosen for this piece of work. Looking into this role has benefited me in the fact that I know exactly what the difference between a basic job and a more advanced job looks like now, as before I was guessing the difference.
This job listing is based in ‘Kettering’ which is a small town located near Northampton. The base pay for this job is based upon your resume, however, this can range from £40,000 - £55,000 a year and is again a permanent full-time position. If I were to start at this company I would be doing something called ‘Hybrid working’ In short this is where you work from home sometimes and other times you will be working in office. If I was to apply and be accepted for this position I would gain lots of extensive benefits which have been listed on the main job listing.
- Bereavement leave
- Free Parking
- Profit sharing
- Company pension
- Paid Volunteer time
- Working from home
- Company events
- On-site parking
Looking at all of these benefits you wouldn’t want to ask for more. This is everything you can ask for and everything that you need when looking into a senior role like this. The pay is good, the job is flexible and it seems to be very reliable. Now let’s look into the company. The name of the company is ‘Towns web Archiving’ and it is a company which specialises in converting physical material into digital ones. They do this a lot of the time to preserve an important piece of history, or maybe to someone with a deep family heritage. They have a long list of clients saying both positive and negative things about the company, which shows to me that they can show their negatives as they have taken them into account and fixed them. Additionally, they have a huge list of the work that they have produced with a deep detailed analysis into them.
Looking into the role they state that the person who takes on the role need to be ‘prepared for leadership’ this is something that is very good to be placed on an application and can give a clear view to people applying that they need to be ready for a high workload. They clearly state in the description which can be located on the job site, that you will be working both front and back-end roles. This is also a very important thing to say when looking for someone to hire as it can show who can run front and back-end applications with little to no problems. Going further down the page you can start to see more of the responsibilities that you will have when attaining this role, these include:
- Lead design and development
- Read and write high quality PHP with the best practice
- Develop high quality and modern UI with HTML, CSS and JavaScript
- Build secure back-end services with API integrations
- Troubleshoot and optimise applications for optimum performance
- Produce clear and detailed technical documentation
- Share knowledge with junior developers
- Keep up to date with the latest industry trends
All of these skills should be required when even looking for this position, and you should even so be able to do more than this as you will be against everyone to compete, so bare minimum will not cut it. Especially since you’re going for such a high role, your portfolio will need to be very extensive with years in a prior position.
Next up is what you as a potential employee need to have(as a minimum) if you do not have these roles you will not qualify for this position:
- 3+ years of commercial experience in PHP full stack development
- 1+ years of commercial experience in Laravel or similar PHP frameworks
- Decent to good front-end development skills which include HTML, CSS and JavaScript + additional skills in Vue.js
- Proven experience designing and implementing RESTful API’s
- Strong understanding of MySQL or similar databases
- Excellent Debugging, problem solving and optimisation skills
- Hands on experience with multiple programs including GIT
- Experience with cloud services like AWS or Azure
- Proactive attitude with the ability to thrive in a fast pace collaborative workspace
- Passion for continuous work learning and keeping up with new technologies
- MUST have a drivers license and be able to get to Kettering 1 day a week
With all of these different things, they set a standards for people applying into the company. This displays a system that if you do not meet these standards or come close you shouldn’t apply, this will cut down applicants and reduce the amount of people that they have to interview. Overall, looking at this job listing for a senior developer I can see that they have a direct type of person that they are aiming to attain in the company. I can see this due to the preciseness of how they word everything. Looking at this job, I would love to work here when I become a better developer as the benefits and the job itself seems like something that I am truly invested into and it is something that I love when looking at listings like these.
What I would do for each part of the course
Research
For this part of the course, I would have to write about a game and create a story revolving around a specific part of a game. This would entail a detailed document for my story which would need to have sources for my work and an explanation for everything I would have to write. It would also want me to write about the game and how I would advertise it to people outside of the gaming industry. This is something that I would have had to write thousands of words on and keep my professionalism and my creative writing as something that would need to be a higher priority. With additionally having another document for my research of the brief etc. Overall, I feel that this would be a lot of work for me to do and not something that I am interested in doing in the future.
Game design
For this part of the course, I would need to create a game in unreal engine which has mechanics and functions like a normal game. I would need to also have documents that explained how I got to the point of creating the game (dev diary) which would have detailed and explained images of how I created each asset and each function for the game I was making. Additionally, I would need to create a huge research document which showed me all the games that I have taken inspiration from. I would need another document showing my research on the course too. I would also need a fly through for my level which would show the viewer the map of the level. Additionally, I would need a showcase for all the different mechanics in my game this being wall running sliding walking etc. Any in-game function would have to be shown off and explained in detail. Which would more than likely mean I need to have another document which explains all the functions of each different mechanic. Overall, I believe that this is something that I would consider doing as it would highly help me, and it is something that I enjoy. But in the end, I think that I’d rather do a different aspect of the course.
Art
For this part of the course, I would need to create a lot of practical work. I would need to start with research on the course and the various aspects of each part. Then I would need some concept art for what I want the final piece to look like; this would involve a lot of different pieces of artwork which I can show off as concepts. This would lead into the main pieces of artwork that I would need to produce, I could either show 1 main piece which is detailed to the best of my ability or show 3 pieces which are all mediocre but display different art styles and or different levels of detail. If I was to pick this possibility, I believe that I would go for the 3 different pieces as it gives me a lot of differentiation between other art candidates and could furthermore make me stand out in my work. I would also need a detailed analysis of how I created each piece of art and how long it took me, this would of course need to be as professional as possible so when it gets read and looked at, I can hopefully impress whoever would be looking at my work. Overall, this wouldn’t be something that I mind looking into doing however I just think that I’m better at different part of the course, so I do not think that this is the right fit for me.
Blender
The next part of the course is blender, this would be creating a scene / model in blender and showing it off to the viewer. Now this would mean that I need to research whatever I’m making. The diverse types of models I could create and the diverse types of environments that I could also make. I believe that if I was trying to do this, I would look into doing more of an environment side of things to boost how large my model is overall and the overall depth that I can add to it. However, I would also need to have a blockout (a very quick model that is made from basic shapes and is only used for a size reference and a placement reference). Then, I would need a low-poly (which is a low vertices finished version of my model that I can unwrap and seam to make the UV a lot better and more readable when I come to texture the entire model). Finally, I would need a high-poly (which is a higher vertices model but looks and acts the same as the low-poly model) I would then have to take them both into substance painter and texture them. After I have completed this I would have need to have a whole development diary and a list of every single model in my project with a detailed description and explanation of how I created it and how I designed it. Overall, I would consider doing this for my project as It is something that I can do considerably well compared to the rest of the group so I believe that this would be something that I would consider. However, there is other aspects of the course that I’m better at which Is available for me to spend my project doing.
Programming
For the final aspect of the course, I am going to be doing programming, this will involve me creating a website with effective UI + UX design in multiple coding languages. For this I will need research into all the different languages that I’m going to be using, and I will need to already have a pre-existing knowledge about some of them. I will then need to research the project and the brief that we have been given so I can have a further understanding of the work and each individual part of the course. Then I will need to make a practical piece of work that displays my skills across all the different languages I will be using. Ideally, I would be making a website which has functionality and can entice the looker of the page. I will need to research into various other preexisting websites and look at their UX designs this will give me the best understanding of how to make my website as accessible as possible. I will need a lengthy list of different code files and image files for inside of the code and even further will need a detailed description of what each line of code does and how it affects the code and website. Overall, I will be doing this for my project as I already have a preexisting knowledge of different coding languages and how they work in detail. I also believe that it is the best choice for me as coding and programming is something that I would like to pursue later in life. So, I believe that doing this for my project and choosing this side of the course will be the best thing for me as it can even further my pre-existing skills and give me a good understanding about how to create certain things in a small amount of time.
Summary
In Summary, I will be choosing the ‘programming’ side for my artefact. This will involve me creating a good website with clear development in UI and UX. I will need to be able to have good development pipeline and a clear understanding of how to make and develop a website from beginning to end. For my artefact I want to go down the route of creating a website which can benefit everyone during normal life. Overall, I feel that doing this will benefit me the most as I have some pre-existing knowledge on some coding languages before this course. (These being python and HTML). I had some quite bare understanding, and after realising I could do anything for this project I believe that expanding my knowledge in the time given would be a lot more impressive to people on-looking my work.
Career progression in each part of the course
Research
Career progression for research can go in a lot of diverse ways, First of all, you would have the opportunity to become a Lecturer. This career path would involve you teaching at a school. College. Or even university level depending on how good you are. You would need to be able to share information to students and adults on how different industry standards work. Which means that you need to have a decent memory to remember everything that you have been taught. You should also have an understanding on the content and can explain it in multiple separate ways to different people; this would expand your teaching capabilities.
The second role in the Research category is a research analyst for games companies. This role would require you to have a really good understanding of researching games and how they work with markets. So, your grades will need to be some of the best if you even want a chance at getting this role. Companies that hire you will task you with looking into the market for different pre-existing games. Looking into the market. And studying what went right and what went wrong for certain games, so your company doesn’t make the same mistake.
The next role that will be covered is a game writer. You would be someone who specialises in writing stories for games. You would need a good understanding of how to draft a relevant story that flows and interests the reader and watcher. You could also be someone who designs the characters backstories which would need you to be able to write an entire backstory for a character that doesn’t exist and that you have nothing to go off from. However, this role is very wide, and you can do a lot with it as games companies usually need help with the historical side of things when it comes to writing backstories for characters.
Another role that you can achieve from research would be a UI/UX researcher. You would need to understand the player behaviour and find out how different players interact with the UI and in what order. This is necessary for games UI as if the UX is bad and the player cannot understand what is happening. It can realistically make or break a game. So, you will need to have some of the best skills in finding out how people interact with the UI and UX. A lot of large companies will hire you as they need to routinely check their UX for flaws and make sure it is as flexible as possible for the user when it comes to interaction.
Additionally, you can become an educational content developer. You would be someone who write materials for teaching and teachers. You could write about how to program to different people and how to design games. This could either be for a website or for a school board. Either way would put you in an acceptable position. You will need a good understanding of how to do every single aspect of the course and understand it fully to your knowledge. This is so when you’re writing your writing will feel smooth and understandable to people reading. You need to try to balance between keeping the reader hooked on your work and making it get through all the things that they don’t want to read.
Even further you could become a technical researcher, which is someone who researches on now game play mechanics and the technical pipelines of different games that already exist. You may be working on prototypes for games and new engines which haven’t been fully assessed. For this role you will need a good understanding of how to research into different genres of games. Which you will need to relay to your company to tell them how to do things correctly.
Another role may include you becoming a games reviewer. You could specialise in researching games and drafting detailed articles for people to read. You may also be someone who writes the reviews and gives games star rating on how much you as a person liked the game. Your work will mostly be displayed to news articles and different companies of games to read. You will have to be as brutal as possible and keep your work correct to how exactly you enjoyed it. For this role you will need to be able to play and draft detailed articles on games that you play. You will also have to enjoy different game genres and play them even if you dislike them. Being bias WILL make you a worse game reviewer in the long run.
The final role that you could take down the researching path would be. Researching into new and upcoming technologies that people haven’t fully understood and heard of yet. As of right now you would more than likely be researching into VR and AI work. You will need to be able to look into the more niche technologies that people haven’t heard about. Which could boost a company and their efforts which intern would make them more money overall. For this role you will need to be able to get into contact with a lot of people and also be able to ask questions about the technology that they are proposing. You will need to write exactly what they say and make it sound as amazing as it seems. Most companies that hire you will be trying to explore the boundaries of technology at the current time. So, your work will need to be some of the best if you want to support your position in the company.
Research Summary
If I was to go down the researching path I believe that I would pick the ‘lecturer’ path. This is as I have already considered this option for my career path in the future and have already deeply looked into this option and line of work. If I was to go down this route I know exactly what I would like to do with it and how I would act. Overall, I think that picking this option would be 100% something I could look into as it is something which deeply interests me. This is as I already have so much fun in helping people understand work and helping them figure things out.
Game design
For game design you can take on the game designing career. You will be tasked with conceptualising game mechanics. Level design. Gameplay systems and much more. You will be collaborating closely with programmers and telling them exactly what you want to have implemented into the game. You will also need to be close with the artists for the first pieces of art to give to the modellers who will create the designs and make them come to life in the game. For this career you will need to have decent understanding on the development pipeline and exactly how a game is created and the process of making and designing a game. You will have needed to attend a decent University and got a good final grade to support your ideas with a finished portfolio about your other positions telling the hirer that you are a suitable candidate.
Next up is a level designer. This is like the game designer role. However, it is specialising in one part of the project and company. You will need to collaborate closely with the programmers to create maps and scenery for the game you’re creating. You will need to also be able to show age with the looks of the map and display an extensive list of things just with the design. Every area will need to be accessible for the player and easy to differentiate between various locations on the map. Your level can’t be too easy, but it also can’t be too hard. For this role you will need to have gone to university and have a good grade to back up your (what should be) extensive portfolio.
Another role could also be a systems designer. This role will need you to design the core systems of a games company e.g. combat. Inventory. Progression etc. You will need to have been to university and have a decent understanding of the games pipelines and how to develop a games system. You will additionally need to have good analytical skills and creative thinking skills.
Furthermore, you could also be a narrative designer. Which would mean you are developing the storyline and character arcs. You need to be able to integrate the story into the gameplay and map features. Which will mean you need to work closely with the level designer and programmers so you can add everything into the game which will make it perfect. For this role you will need to have a decent education(more then likely university with an additionally extensive portfolio showcasing your years of work) with a good understanding of story writing and creating legible and understanding character arcs.
The next role in the game designer tab is the game producer. You will be tasked with managing your teams which will need leadership responsibilities to start, and I will need to be able to budget and schedule tasks for your team. To complete within certain times that the company gives you, you will also need to make sure quality standards are always met and the customers are happy with the game and product. For this role you will need to show good leadership and a satisfactory grade at university to secure this position.
Another role in this industry would be a UX/UI designer(this is for in game content NOT a website). You will be expected to have a good pipeline understanding and will need to confidently be able to code UI and have a good understanding of UX integration into your UI if your UX isn’t sufficient then your UI will automatically be downgraded. You will need to focus on the user interaction for the specific UI and figure out how the players will function. As when they instantly see your UI, they should know exactly what to do without even thinking about it. For this role you will need a good understanding of multiple different coding IDE’s(VSCode, etc) and languages which will boost your overall work experience.
An added role for this industry will be a technical designer. This role will need you to be able to work between your coding and designing skills. You will have to make prototypes for different technical pieces of work and be able to confidently make complex mechanics in a brief period of time. You will often have to have a good understanding of unreal engine and Unity blueprints and code. For this you will need a satisfactory level of education in programming and a showcase of all your work more than likely in the form of a well presented portfolio.
The next role in the industry will be a gameplay programmer; this role will be someone who is able to work through coding and collaborating closely with designers to create mechanics and maps with an efficient and effective methodology. For this role you will need to be able to understand industry pipeline and look into the different coding languages and be able to efficiently and effectively understand them in a reasonable time without weighing down the company and holding back deadlines.
One of the final roles in the industry should be a creative director who will oversee the creative directions of a project/studio. They will need to set standards for the company and give people directions with their storytelling and level design. This position would usually be something that comes after a decent period of time working at a specific company and is only offered to the best of workers. For this role you will need years of experience in the industry and be able to show high-level leadership and control of others.
For the last role in the industry, it will be a design researcher. This role will have to investigate into the community and into the players. They will have to figure out exactly how the players work and navigate through the game. This can be done in a number of ways. They will need to implement modern technologies into the game and inform people about improving the games overall design. This is again a position that is obtained after years of working at a specific company and should only be given to people who show the highest potential and request for this position. For this role you will need multiple years in university with more multiple years in the industry. Your leadership should be a main thing that you can display as it will be something that the higher-ups will be looking for when hiring for this position.
Art
The first role of the Art side of the course will involve being a concept artist. They will be making hundreds of different ideas and very low-quality designs for levels. Most of the work that a concept artist will do will more than likely never seen as they need to be very strict with how it looks and is designed so when they show it to the programmers they have a 100% clear picture in their heads on how to design the level. You might also be told to make a final design once your low quality one is approved. This is something that will be done on a computer so everyone can see it, and it can be corrected distributed to the whole company to look at. For this role you will more than likely need a satisfactory level University degree and understanding of game concept art.
For the second role you will be specifying in character Art. This is where you will have to create mock up and realistically rendered characters in both 2D and 3D spaces for games. Films. And animations. You will be expected to be able to focus on anatomy and making the character as accurate as possible to the game and time of the game like the artist a lot of your work will be scrapped, and you will have to have multiple mock ups of how each individual character should look. Hundreds of pieces of work shall be needed to be binned and shown to characters. For this role you will need to be finished with university and able to list the parts of the body and exactly how to create them on a satisfactory level. You need to be able to draw with different art styles for unique styles of games (if you’re looking to go for a big industry)
For the third role you will be a specific environment artist. This artist is where you will also be making mock ups for the environment of a game. You will need to convey actions and show the age of the scene you are making so a lot of experience will be needed to even begin making environmental art. Then you will need to be able to make 100s of mock up scenes for the programmers and unreal engine experts to look at and know exactly what they need to make when creating the scene/environment. For this line of work, you will need a good University education and a strong portfolio to display your previous work and how well you can optimise work.
For the fourth role you will be a Texture Artist. This role will have your creative textures which can be drag and dropped onto existing meshes. You will more than likely be given a theme and a time to complete the work in and be expected to create a high-quality texture which is optimised and easy to use for the modellers. Most of your work will be used compared to the other artists as you will already be given a theme and a clever idea of how to create the texture. However, it doesn’t remove the possibility that your work is unused and discarded. For this role you will need a high-level education that you can show and display to other members and hirers. You could be working from home with multiple companies or in an office with a single large company. You can choose when you accept the role and decide to go down this route.
For the final role you can become an art director. This is a senior role which can oversee and hire new artists. You will need to be able to show good leadership and prominent role skills so when you’re overlooking newer artists you can give them guidance and advice. This role will only be offered to the most prestigious of artists with the most skill and luck in the leadership role. Most artists will not make this position as it isn’t for everyone, and a lot of people will decline it as they like doing the more firsthand work. Which is obviously a downside of picking this role. You will spend a lot of your time trying to hire and look for new employees with more potential than the last. For this role you will need countless experience in the industry and will need to show excellent leadership and control of others. This role can be achieved with the upmost work and some of the highest University degrees and grades.
Blender
For the first role of Blender, you will be a “generalist” which is good at generally everything in modelling. You will need to be able to show industry standard pipeline when creating your work and cleanly and confidently display it to a larger amount of people. You will mostly be creating a wide variety of models and designs for different things and items. This role is one of the most common as it doesn’t limit the person on what they can create, and it allows for more creative freedom. However, I’d say that doing this is one of the harder roles as you need to be able to create. Models for small and larger props. You need to be able to make assets and asset packs for large and small scale. And finally large and small-scale environments. You will need to be also able to texture. UV map. Create suitable lighting. And render small animations and film. For this role you will need an extensive portfolio displaying all of your work in a polite professional layout. It will need to be detailed and show exactly how you have followed the development pipeline with links to your files and timeline of creation. You must show the employer that you can easily and efficiently create high quality work. you will also more than likely need a good qualification into modelling and 3D pipeline work.
For the second role of blender, you will more the likely be a hard surface/prop Creator/Artist. This role will need you to be making hard surface models. Which is usually defined as something like a car. Or a weapon of sorts. Anything that isn’t organic will more than likely be hard surface. You will need to specialise in creating high detailed and different styles of hard surface props. It will involve you highlighting your work to the map and level creators who will place your props around the map/level to be shown off. A lot of your work will be discarded and not used however you will need to have 100s of models that you spend countless hours working on. You will need to prioritise your edge flow and your texturing to make sure each model that you send to the level design team is efficient and optimised for the game. As your models are going to be rapidly placed across the map of the game. It needs to be as optimised as possible to show perfect performance. For this role you will need a good University qualification and a good understanding of the proper development pipeline to display your work. you will additionally need a great portfolio of your work (hopefully full of hard surface props which you can show and say that you designed yourself).
For the third role in the blender industry, you could be doing lighting art / rendering. This is where you will be making light maps and changing the light levels in maps for the light to render in specific locations. Your work will almost always be used as when you fix the light in levels it should be a change that is permanent. You will be mostly doing postproduction work and rendering realistic looking scenes. Your work won’t have to be styled as much. But you will still need to be able to have different stylings in your lighting. As if you used the same lighting for every room, it would look odd. Let’s say you used the same lighting in a house as the same in the street. It would give off a different type of energy when you enter the scene. You need to be able to think about everything subconsciously. For this role you will need a high-level University degree to even have the opportunity to do this. You will also more the likely need multiple years of work in the industry to even secure this position. As light mapping is one of the hardest things to do in the scene and modelling work.
For the next role in the industry, you will more than likely be doing product visualisation. This is where you will use blender to create photorealistic images and videos for companies and architects. You will need to make your models as realistic as possible for companies to display high quality products. You could be making anything from clothes to cars in this industry. Your skills will need to be very advanced as you need to be able to make small models and large-scale models in small times. For this role you will need an exceedingly high understanding of product managing and how to make photo realistic models in quick time. You will more than likely need a university degree or a really good portfolio of photo realistic work that you have already done for different companies. Hours of work will need to be done to attain this position.
For the final role in the industry, it will be freelance work. This type of work is very haphazard with the pay and reliability. This job is more something that you would need to start your own business for. You will need to have a good understanding about how to push your work to the right people for the right price. You would also need to understand business and how the market and trends work. you need to rely on the fact that your models are so good that people will buy them continuously. You will need to have extraordinary resources and capabilities in blender to even consider this as an option. As most of the time you will be relying on the sale of your work and how well it sells. If you do manage to make it however it is something amazing to put onto your CV and Portfolio as it shows that you started a business from nothing and can very much boost your initial role in a company.
Universities for each part of the course
Research
The first University I’m going to be looking at is the University of Southampton, located in Southampton, England. The course name is “Creative technologies” and at the end of the degree you will get a Masters. The course is only a year with a £11,000 Fee for UK citizens and an international fee of £31,200. After taking a good look at the University, I can say that the rating of this is around an 8/10 as the campus looks inviting and the student accommodation looks decent. I think that if I was doing research and needed to go somewhere Southampton would be one of my top picks. The grades needed for this course start at a 2:2 undergraduate level degree plus a heavy portfolio.
For the second University I’m going to be looking at UCA (University of creative arts) which is located in Canterbury. Farnham. Epsom and Maidstone. These are all four of the main campus locations. However, the location that we will be looking at is in Farnham. The course we will be looking at is called the “MA Game Design” (MA meaning masters) You should be leaving the University with a Master’s degree. And the duration will only be yearlong. The average fee for UK citizens should be around £10,900 and if you’re an international student I will be around £17,500. After taking a look around the campus and looking into the student accommodation I can safely say that this is around about a 9/10 due to the pleasing and modern aesthetic of the campus and overall course content and reviews. The grades needed for this start at an honours undergraduate level with decent industry experience and a good portfolio.
For the next University I’m going to be looking into I’m going to pick Falmouth University, which is situated in Falmouth, Cornwall, England. The name of this course is “MA Game Design” (MA meaning Master’s Degree) and when you finish the course you will end up with a Master’s degree. The duration of this course is 1 year long. And the cost starts at £10,900 for a UK citizen. If you are an international student however this can change to upwards of £17,460 a year. After looking at reviews made by past students and looking into the nice accommodation with a wide variety to pick from id have to say that this University is also a 9/10 off the course material and the nice-looking accommodation. I also looked into some past lectures that have been recorded and taken in the content of them. I would have to say from those lectures I can say that the course content is nice and well presented. The grades required to secure a place at this university include an undergraduate level degree of 2:2 with some relevant experience.
For the fourth University I’m going to be looking at, I have picked “MIT” (Also known as the Massachusetts Institute of Technology) which is located in Cambridge, Massachusetts, USA. The course I’m going to look further into is called “comparative media studies” which is the equivalent of a Masters in the UK. The duration of this course is 1 year long and at an international cost of £53,500 you expect a lot. The architecture is some of the best I’ve seen and the content of the lessons (which I’ve got from reviews from previous students) seems to be some of the best for technology in the world. MIT continuously places #1 or #2 every single year for technology and is so advanced with their teaching. That people will travel across the world to attend. The accommodation is fairly basic. However still well designed and thought after. If I was rating this University, I would have to say 10/10 and from what I’ve heard from student I would have to say that they say the same. Some even quoting “It was marvellous. It was wonderful. It was splendid. It was a blast. It was fun and nice. It was marvellous.” And some even saying “It is extremely challenging but extremely rewarding.” Which just goes to show that even the students love the University, and it would be an honour to attend. The grades required for this university include. A bachelor’s degree, an excellent portfolio, a sample of your writing. Transcripts and 3 recommendations and references.
For the final University I’m going to be looking into, I have picked “Georgia Tech” which is situated in Atlanta, Georgia, USA. The course name is “Digital Media” and is the equivalent of a Master’s Degree in the UK. The course is 1 year long and with a £27,000 Yearly cost on average you expect the highest quality life there. The campus grounds look intriguing and interesting. Some even being complex. However, the Accommodation is quite the opposite. Some of the rooms look tiny for what you pay for and considering you have to spend a lot of money to attend it’s not what I would expect. However, the content of the lessons that they teach is interesting and different from what I would expect. But that isn’t a bad thing. Some students have quoted “My experience at the Georgia Institute of Technology has been challenging, rewarding, and full of growth.” The same student was also quoted saying “However, the workload can feel overwhelming at times, and more mental-health support and academic balance would greatly benefit students.” Also, some further complaints from a different student “Georgia Tech is an amazing school for academics. However, that’s about it. The party scene is non-existent, and student life is pretty terrible.” They also stated, “you spend your entire life studying just to keep up.” Which reflects on the University as a whole. In the end I think I would have to rate this University as a 6/10 as there is a lot of negatives coming from attendees and the accommodation doesn’t look the most inviting. The grades needed for this course include a bachelor’s degree, portfolio. A writing sample and an English test.
Game design
The first University that I’m going to talk about for the game design of the course will be “Staffordshire” which is located in Stoke-on-Trent, England. The name of this course is “computer games design” and after you leave you will be left with a bachelor’s degree. The duration of this course is 3 years and with a UK citizen fee of £16.500 and an international fee of £16,500. Making the overall cost of the course just shy of £50,000 The course is one of the best in the country taking the 58th spot in the country. After looking into the content of the course I see a lot of positive reviews from multiple students who attended. One student said, “The blended learning approach works really well — a good mix of in-class sessions and online resources” they also stated, “Lecturers are approachable and easy to contact, which really helps keep the learning experience smooth.” Another student who was remote and working from home said, “Remote student, but so far all comms has been great.” Which reflects on the University showing that they have excellent communication to everyone on and off campus. After looking at the accommodation, I can say that it looks simple yet homey. Which is something that you will need if you’re moving a while away from home to attend the University. The staff seem supportive to student goals, and I believe that this is one of the best universities to attend in the UK. The grades required for this course include. 112 UCAS points or an A-level at a BCC or BBC level. Which is also the equivalent of a BTEC DMM (Distinction. Merit. Merit).
The second University that I will be looking into is called “Manchester Met University”. This campus is located in Manchester, England. The name of the course is “Games Design” and upon leaving you should have attained your bachelor’s degree. The duration of the course is 3 years long and at a UK fee of £18,500 and an international fee of £18,500 meaning a total cost of the entire 3-year course is £55,500. You expect a lot. One student state “The staff, peer guides, students etc… Have been incredibly supportive! They help whenever they can and provide the necessary information to succeed.” This shows that the University is helpful and pushing students to try their best and succeed in their career paths. And after looking into the course information and what they have to offer to the students I can gather that the course is beautifully detailed and explained by talented lecturers. After looking into the accommodation, I can say that they are simple. Yet modern. They make the person who is staying their feel at home. Some students who live in the “Canvas” building state “I really like the accommodation location because I can go everywhere just by walk and it’s really close.” Which shows the availability of the housing and how they can do whatever they want freely without having to travel far to do anything. This can make or break someone’s University life and make the experience a lot more enjoyable. The grades required for this course include. 104-112 UCAS points which is the same as an A-level BCC and or BBC. Which is another equivalent of a BTEC DMM (Distinction, Merit, Merit).
The third University that I am going to be looking into is “Abertay University” which is located in Dundee, Scotland. This course is called “computer games” and is the equivalent of a bachelor’s degree in the UK. This course is 3-4 years long depending on if you would like to do an extended year at the end to further your education. At a UK fee of £14,000 a year and an international fee of £18,000. Your time at Abertay could cost between £42,000 and £54,000. A student can be quoted saying “Small and supportive department where you feel valued as an individual. Enthusiastic and motivated academics Graduate school provides a vibrant collegiate environment for working. Good tech resources, support and training” this reflects upon the University as it shows they have a good environment. Technology. And a clear understanding of what they are teaching. The same student can also be quoted saying “Tutor meetings in person or at home.” Which shows that even the tutors will go out of their way to make sure that specific student is keeping up to date with everything even if they can’t attend in person. Students say that the accommodation there is some of the best value for money and that they feel that the accommodation is modern and kept well. They also state that it is rather close to everything outside of the University which is something good to keep in mind when picking a university. Overall, I feel that this University is a good option if you’re looking to join the games industry, and that students and lecturers love their role and jobs. The grades required for this course start at a Scottish A-level plus GCSE level B or grade 5 in Maths.
The fourth University that I’m going to be looking into in the games design industry is going to be “USC” (also known as the University of Southern California). The course name being “Interactive media and games” and at the end of your 3-year long journey there you can achieve the same grade as getting a bachelor’s degree in the UK. The international fee of attending this University will start at £60,000 a year! That’s £180,000 over the course of your three years there. So, you will expect a lot from joining this University. And I can confirm that you will get your money’s worth here. Some students can be quoted saying “Wow the university is a good place of study and achieving dreams and destiny, the university gives room for young star both in sport and academics, the university of California is the best place of determination and growth”. This reflects upon the university as it shows that they have good reach for students and push them to be their best that they can possibly be. This university is placed top 100 in the world for the best universities. As far as the accommodation goes it’s pretty basic with some modern aspects however a lot of people complaining that there is no A/C throughout most of the University. Overall, I feel that USC is a really good university for someone who’s willing to spend a little more money for a good course. The grades for this course include a strong high school record and a portfolio. For international students they will need to take an English test.
The final university for games design that I will be looking at is called “RIT” (also known as Rochester Institute of Technology) which is located in Rochester, New York, USA. Upon completing your 3 years at this university you will attain a bachelor’s degree in the UK. The starting fee for this university is at £45,000 a year. Which Is £130,00 after your full 3 years attending. After looking into the content of the university I can confirm that the material used to tutor students is well explained by smart people who know exactly what they are talking about. A student can be quoted saying “I started back in August 2025, and I honestly have really enjoyed my time so far.” However, can later be quoted saying “Sometimes it’s a little dirty, but I want to blame that on gross college kids. It is pretty expensive to go here”. Which reflects on the university being good however expensive and dirty at times. Which they say is due to the university children being “gross” as he says. Another student says that “While they also do have a UX/UI class, I wish they had a more intensive one. Outside of classes, the campus is big and pretty nice.” Which shows that they feel as if the content is either too easy for them or that they feel as if they didn’t learn as much as they thought that they could. They also feel that the campus is a nice environment for them and that it is fairly sized. The accommodation is described as “The room was nice and clean” with lots to do and see around the campus they also state that it is a “good value for money”. Overall, I would say that “RIT” is a good university if you’re looking for a luxurious basic course to enjoy your university life. The grade for this course requires the applicant to have a minimum of 4 years of English. 4 years of maths. 3 years of science. And for international students an English test.
Art
The first university that I’m going to be looking at for the art aspect of the course. Is going to be “Royal college of Art” which is located in London, England. The name of this course is called “Art and Design” and after a year of attendance. You will come out from the course with a master’s degree. With a UK fee of between £15,000 and £35,000 a year. And an international fee of £35,000. You should expect a high-quality University. Additionally with the school being the No.1 art school in the world. And after looking at some student reviews from past and present students. Some have to say some good things about the university. Like how one student mentioned “Great facilities - Knowledgeable staff -Time to experiment and play -Meeting and collaborating with other people -Good end of year show -Good time near the end to develop our final major projects.” Which reflects on almost all aspects of the course and displays how well it is organised and taught to students. However, one downside that I discovered is that they do not have an accommodation centre and or hub. All that I can find is some private accommodation which is a few minutes’ walk from the university. This isn’t as good as you would think considering the price of the university already. You would expect them to have at least something. This is also a negative thing that I found which students complained about in quite a few reviews. Stating that they can barely afford to live and with the price of the nearest apartments they end up not affording anything. The grades needed for this course include a degree OR professional experience in the field of art. Additionally, with a strong portfolio too.
The second university that I’m going to be looking into is called UAL (or the University of Arts London). This University is situated in London, England. To finish this course (which is called “Fine Art / Illustration”) you will need to do 3 years, and you will leave with a bachelor’s degree. At a starting UK fee of £9,250 a year (which totals to £27,750 over the course of the 3 years you could sit) and at an international cost of £25,000 a year (which totals to £75,000 over the 3 years you can sit). This university is the Top 2 university for Art and design in the entire world and has a positive reputation. However, the numbers don’t define the university. Some of the students have said “The atmosphere is so inspiring — surrounded by enthusiastic, like-minded artists and tutors who genuinely care about your work.” which shows the school and how they have tutors who actually enjoy and care about the kids which they speak and teach. This is something that I find a lot of universities miss. As far as accommodation goes a few students from the “parish hall” rooms have said that “wonderful place to live” “The team has given me a feeling of home in a different country” both of these comments (from the same student). Tell us that the university is caring for students who have come internationally and trying to make their education and their time at the university the best it could be. That same student also says, “The location is also extremely convenient.” Again, another positive about the university as a location is a main factor for nightlife and fun outside of university work etc. Overall, I would say that this is a good university to pick. As it being top 2 in the world and the Decent price range it’s really an easy decision which university you pick!
The third university for the Art side of the course I’m going to be looking into is called “Pratt institute” Which Is located in Brooklyn, New York, USA. The name of the course specifically that I’m going to be looking into is called “Fine Arts”. After your 3 years in this course, you will finish with a bachelor’s degree. The yearly fee of this university costs £29,000 (which in total is £87,000 over the course of the 3 years you can sit). I have looked into some comments which officially verified students have posted about the university and found some interesting facts. Like how this one student states “Pratt is a great school academically and has a beautiful campus.” Which shows how the school is appealing to look at (which is good as you might be living there for a while). However, it’s not all positive. The same student further leads on to say, “There is not a great on school party scene” and “The food is not great and there are very few options. Depending on what dorm you’re in you can either have a great or horrible experience.” Which shows that the outside life of the school / university isn’t good which also means its still there. However, it’s poor and disregarded. Which isn’t something that 18 – 21-year-olds will appreciate. They also say that the food isn’t great and that it could be improved. Again. It’s not something that you’re wanting to have when you’re spending multiple years of your life in that same place. They also say how the dorms will depend and rely on your experience. This is something that could highly impact an experience as the better dorms the better your experience will be. Meaning the more money, you spend the more you will get out of it. Overall, I don’t think that this university is something that is for everyone. If you’re looking to do only work and ignore the party scene while spending a little extra money, then I would say go for it. However, for me I don’t think that it would be beneficial as I’m not the type of person to blow money all the time.
The fourth university that I’m going to be looking into for the art side of the course is called “RISD” (also known as Rhode Island School of Design) which is located in Providence, Rhode Island, USA. The name of this course is called “Fine Arts / Design” and at the end of your 3 years attending the school you will end up with a bachelor’s degree. The average cost of this university is £49,000 a year (which totals to £147,000 after the 3 years of full attendance). After looking into the content of this course (by looking at past recorded lessons) I can confirm that the art side of things looks very professionally taught and well designed. Some students who attended this university have said “I can confidently say the experience is both intense and transformative. RISD demands a lot—long hours in the studio, constant critique, and a relentless push to refine your voice as an artist or designer—but the payoff is tremendous.” This shows that the school tries to push you to your limits while giving you the best worth of your money. This same person also states “RISD isn’t easy, and it’s not for someone looking for a typical college experience. But if you’re serious about design and ready to be pushed, it’s a place where you’ll grow fast”. Again, this further pushes the idea that they want the best for you. Which is something that you really need at university. You don’t want to get left in the dust by lecturers who don’t care about you. You need people who have the same passion as you and people who care. The accommodation side of things is as good as these students say, “It is situated in the heart of the historic district of Providence, which has a cool college town vibe.” Which tells me that the location is adequate for students who love the art side of things. Overall, I think that if I was doing art I would more than likely pick this university as it looks open to people and very accessible. There is little to no downsides of this university and it looks very professional.
The final university that I’m going to be looking into for the art side of the course is called “Beaux-Arts Paris” which is located in Paris, France. The name of this 3 yearlong course is called “Fine Arts” and when you finish the 3 years you can leave with either a bachelors degree or a master’s degree. The price cost of this course varies from £3,350 to £8,600 a year (which equates to either £10,050 or £25,680 after 3 years) some of the problems for this university include the fact that it is extremely difficult to even get accepted into it. And some people even state that when they did get accepted into the university the student were acting like “fools” said one student and that they haven’t changed at all. This reflects on the university highly as it shows the type of people that they are allowing into the university and how they clearly care less than they could. However, the interior and architecture are apparently amazing. This one student says “Magnificent building, the one that houses the Academy of Fine Arts in Paris. Its architecture is impressive, but what truly takes your breath away are its extraordinary interiors. A real gem!” This is showing me that the entire inside even the room to the campus looks and feels amazing to live in and around. It can make or break a student’s decision to even attend so this could be a redeeming factor. Even after it being the most prestigious university in Paris you would think highly. However, a lot of former students have said that the behaviour issues have gotten out of hand and not even the staff can control them. Which has brought the schools overall rating down. Overall, I feel that if I was doing art, I would only consider this if I really needed to it seems really professional and fancy. However, I feel that it would be almost impossible to attend and secondly the behavioural issues would sway my opinion.
Blender
The first university that I’m going to be looking at is called “Bournemouth” which is located in “Bournemouth, England”. The name of this course is called “computer animation” and it is 3 years in length. At the end of your 3 years in this course you will end up with a bachelor’s degree. At £9,250 a year and a £16,000 international fee. Your 3 years could cost between £27,750 and £48,000. After looking at the content of the course, I can confirm that they go into depth about creating animations in blender and exactly from start to finish. Some students have said “There is also a lot of cafes where you can easily buy something to eat”. Which reflects upon the university and their student wellbeing. It shows that they care about what their student have and how well they are always having their needs met. Some of the accommodations are some of the best I’ve ever seen with some students even saying “It was great staying here and the management team were all amazing and super welcoming” this reflects on the university as it shows how well they care about their students as a whole. Overall, I believe that I would 100% consider this as an option for my university if I was doing blender as the good reviews and the good acceptance rate.
The second university that I’m going to be looking into in the blender side of the course is called “Falmouth University”. Which is located in Falmouth, Cornwall, England. The name of this course is called “Animation / Game Art” And it is a duration of 3 years. At the end of those 3 years, you will end up with a bachelors degree. The price of this course is £17,460 a year (which will cost around £52,380 in the 3 years you attend). The content of the course is different to the last one as for this one they do more on the art side of things, however they show how to animate the art that you produce. Some previous students who have attended this university have said “Great university located in a beautiful coastal town. The staff are kind and supportive, and there to help students in times of need.”. this is one of the best reviews that a university can receive. It shows how they help students no matter the situation and that the location of the university is amazing and beautiful. Which is always a factor in determining your university life. Another thing about this university is the student accommodation and it’s something that they do very well “Their facilities are very modern and quite new. They have cleaning staff that come by weekly to clean the shared spaces like hallways, the common room, etc. The staff here are always ready to help you to the best of their ability if you have any issues.”. This student comments on how the whole place feels modern, this is something that a lot of students will like about the university as it’s somewhere where they are going to stay for multiple years of their lives. Overall, I feel that if I was doing the blender side of the course I would more than likely pick this option as it seems very friendly and very heavy on the academic side of things.
The final university that I’m going to be looking at for the blender side of the project is called “Sheridan College” which is located in Oakville, Ontario, Canada. The name of this course is called “Bachelor of Animation”, and you will receive your bachelor’s degree in 3 years of attending. The cost for this course starts at £18,400 a year (which in total will be £55,200 over three years). Some students have said some amazing things about this university including “the best decision I have ever made”. This is an amazing review for the university as it shows that the student loved their time at the university. This tells me that what they were teaching is amazing and the whole course is something that they loved in general. Accommodation also seems nothing short of amazing to with multiple reviews like “Excellent location on campus. No loud noises and not a typical college dorm layout. Nice and clean facilities with fridge and microwave.” Which shows me how they can balance between accommodating students and also providing quality learning and resources.
Programming
The first university that I’m going to be diving into for programming is called “Oxford University” Which is located in Oxford, England. The name of this course is called “computer science” and it will give you a bachelor’s degree at the end of your 3 years in university. The starting UK fee for this course is £9,535 a year with an international fee of £37,380 a year (which could add up to £28,605 or £112,140 over the three years you stay at university for.). With a price point this high you should expect the highest of everything and the best of both worlds. One student has said “Help is very accessible and the careers service is incredibly useful and there is a lot to take advantage of from free online courses to exclusive opportunities such as internships.” And I’ve taken the time to look at one of these online courses and I have to say that they are incredibly detailed and well explained. It’s one of the best that I’ve looked at so far. Next up is the accommodation side of things and oxford doesn’t disappoint “Prestige Student Living in Oxford is super modern and comfortable, and the staff are always really nice and easy to talk to. The rooms are great, everything’s clean.” And all they had was one negative and that was “Though it is little bit far from the city centre” However, they later said how it wasn’t a problem and they liked the time away. This shows me that Oxford cares about their student’s accommodation and have thought about every type of person who may attend. Overall, I would 100% consider this if it wasn’t for the extreme price point and it would more or less be my first choice. However, due to the price of everything that I would need it doesn’t look possible for me.
The final university that I’m going to be looking at for programming is called “Cambridge University” which is located in Cambridge, England. The name of this course is called “computer Science” and it is 3 years long meaning that you will leave with a bachelor’s degree. At an initial UK fee of £9,535 and an international fee of £39,162 (which will be around £28,605 or £117,486 over 3 years). Some student reviews that I found said “Cambridge is truly one of the most remarkable cities to live, study, and explore. Its rich history, stunning architecture, and vibrant academic atmosphere make it an inspiring place for students, professionals, and visitors alike.” This shows me that Cambridge isn’t just defined by the university and it can expand and entice people into the main city to do things outside of university. Which is what you want to do when going to university. Next up is the accommodation side of things “I really enjoyed my two years living here. The building is clean, cosy and well maintained” showing that they still care about the accommodation side of the building and not just the main area. Overall, I would consider attending this university due to the large city and the fact they care about the students, and their health is also a really good factor. However, the price and grades needed are extremely hard to achieve.
The University I Want to Study At
The university that I’m planning to go to after this course is De Montfort University, in Leicester. The course I’m looking at is called “Computer Games Programming”. In this course I’ll be learning everything from basic C++ fundamentals, then getting into Maths and how computer systems actually work. Most of the time in the course I’ll be working inside Unity and Unreal Engine where I’ll properly learn about game creation, design, and how everything functions. After the 3 years, if I stay the full time, I’ll finish with a bachelor’s degree. From that degree I can go into loads of different things like Game Development, Engine Programming, AI stuff, or Web Development. Web development is the one I’m most interested in because of UI/UX design. The workload is supposed to be around 10 hours of actual lessons a week and then 30+ hours of independent study. But being realistic, I’ll probably end up doing around 50 hours a week, because I’m genuinely enthusiastic about this career and want to learn as much as I can. The entry requirements are around 104–136 UCAS points (which is pretty much DMM) and at least 5 GCSEs grade 4 including English and Maths.
During my first year on the course, I expect to be doing basic game design and development. This might include working on pre-existing games and making changes that I think fit better or starting a small game completely from scratch with a deadline. By the end of the first year, I’ll need to be able to produce a decent level game. I’ll also probably work with smaller programming languages which I already have minor experience in like HTML, CSS and maybe even a little JS(JavaScript). Plus make a basic website (which I’m already practising now in my own time). I’ll also be learning maths and basic computer systems and how they work. The maths will mainly be for figuring out physics, how to place elements in an engine, and understanding how everything functions. And then I’ll start learning basic C++ fundamentals. It won’t be too deep at the start since I’ll probably end up learning most of it at home anyway.
During my second year, I’ll be doing a lot of the same things but at a higher level. I’ll probably start doing some 3D modelling where I’ll create decent-level assets for games. This helps with asset creation and knowing how to place things into a game map properly. I might also look into shader fundamentals, which is how you make things look different or add effects. We won’t go too deep into it because it’s difficult, but I’ll still learn the basics. I could also be doing mobile game creation and AI simulation. That could mean making enemies with certain behaviours or using AI to load map layouts or generate random levels. We’ll probably work quite a lot on this because it’s future-proof and important. I’ll also learn more advanced mechanics like movement systems, weapons, and how everything interacts. There might also be a section where we use different engines besides Unreal and Unity so I can expand my overall programming knowledge. And finally, I might be learning production-level C++. That will probably come easier to me because I’ll spend a lot of my home time researching and learning it anyway.
During my third and final year, I’ll go into advanced game engines. This will mean going deeper into Unreal and Unity and learning how their specific systems and coding formats work. I’ll more than likely be tasked with creating a full game by myself. This will take a lot of my time and will decide a big part of my final grade. I will try my best to make the best game I can. I’ll also be doing advanced shader programming like making light maps, lighting effects and improving how the game looks overall. This is one of the hardest things to learn because it needs a lot of maths and patience. I’ll probably also do performance rendering in C++, which will assess how well I can optimise a game. This could include balancing graphics, frame rate, and getting everything running smoothly even on lower-end systems. Then at the end of the year, I’ll do my final project which needs me to use everything I’ve learned over the 3 years and put it into one final game.
Overall, I think DMU is the best university for me because of the location, my passion for the subject, and my reliability. The university is only around 30 minutes away from me which makes travelling easy. Since the course only needs around 10 hours a week on campus, I’ll probably only be in for 1–2 days and then work from home for the rest. I learn better at home anyway. I also feel like my passion for the games industry is the highest it’s ever been and I want to keep that going. And finally, my reliability is one of my strongest points. My attendance throughout education has always been between 90% and 100%, which makes me more dependable than a lot of other applicants. It also shows that when I’m present, I actually try and put effort in.
What I’m making
For this project I’m going to be designing, coding, debugging, and publishing a portfolio for myself. Which, will further develop into people being able to publish their own portfolios with built-in templates that I will create along the way.
To start I needed a way to design my work, so I initially thought of using Photoshop, which would have been my best shot. However, I quickly discovered that my skills in Photoshop aren’t the best. So, one of my associates told me about a website which was called “PenPot”. This website would allow me to create designs (much like Figma) for free, which was a game changer when it came to designing. This website allowed me to quickly create designs in different themes, styles and layouts. I could make tens of designs at a fast pace. So, I decided to make 3 really good (light mode) designs of an initial website. I would then make the dark mode version for each website for accessibility reasons and explain everything on PenPot.
After this I need to start the coding process which I will mainly be using “CSS” “HTML” and “JS (JavaScript)” to code with. The application I will be using to write all my code on is called “VS Code” and it is where I will be placing all of my code.
Additionally, I will need a way to keep track of the changes which I make to my work in what order and what day I do them. To do this I will set up a professional GitHub account and start a repository. This will make it so whenever I make a change (and commit it into GitHub) it will track what I do and when I did it with a description which I must write myself. This will track everything that I do and keep everything in a timeline history order. So, if I were to accidentally delete a bunch of my work all I would need to do is go back in time on GitHub and refresh my work to the last commit. Most of my commits will be after I write a decent block of code (so if I did make a mistake, I wouldn’t lose that much work). After setting up GitHub and making sure it works, then I will start the coding process.
I will more than likely start with defining the HTML document and making sure that it links to the CSS document and my JavaScript (for simplicity when it comes to coding later down the line). I will then define all of my “divs” early on and write them all down in a separate note file (as it’s easier than remembering all the different class names). Then I will start with the flex-boxes which will define the area which I can place all of my work inside of. That is the easiest part, next up will be creating the transitions between the popups of my work. This is something that I will need to do some more research on and will more than likely be using websites and tutorials for (because I had to learn JavaScript specifically for this project). After making the transitions and making sure all the popups are closable, I will have to go through my entire code and write about each individual line of code. So, I can tell the viewer of my code exactly what every line does (this shows my understanding in the code and how everything works in general).
Next up is the harder part. I need to write everything into the different flex-boxes and keep them in their respective divs without messing everything up along the way. I will start by getting all of the images that I want to use for the entirety of the code and convert the smaller ones to SVG files using a free online converter. After attaining all of these SVGs, I will drag and drop them into VS Code and begin to place them all throughout my project exactly where I want them. This means I can write all of my text and headings around the pictures (which I find easier). After completing this, I will mostly be done for the coding part as I have all of my working buttons, download links, and my personal pages linked. All I will need to do is debug my code and that will be the end of the coding part!
Next up is debugging. What I’m going to do for debugging is going through every line of code. If I can find a way to optimise it more, or it doesn’t work, I will fix the problem and make it cleaner / better for different browsers to understand (this is so every browser can access the content appropriately). I will also assess the website on different devices like my phone, a tablet and my laptop to make sure the layout doesn’t break. Sometimes flex-boxes look different on smaller screens, so this will help me fix any sizing issues. Additionally, I will delete any lines of code which have become “useless” to me (as in that they don’t do anything anymore and or they are old elements that I didn’t use). Then after a long debugging session I should be almost ready to begin the process of me uploading this project to Cloud flare.
Finally, I will need to upload to Cloud flare. Cloud flare Pages basically lets me host my website for free using a subdomain, so I don’t need to buy a domain name. It also updates automatically if I connect it to GitHub, which means every time I push a new commit, it can redeploy the website for me, which is way more convenient for me as I don’t need to worry about updating files manually in a normal domain setup. Once everything is working, I will make the website public so anyone with the link can access it. This will be the final stage of the project and will bring an end to my work.
Researching
For the researching part of the project, I will have to research everything I do. Every website and every application that I use will need to be explained fully in detail. I will do this along the process and after every stage that I complete. This will involve me researching each website I use and explaining how it helps. I will also need to research most of my web apps like VS Code, where I will explain what it is, how it works, and what I can do with it. These research sections will mostly be short as I’m going to have to write a lot of different definitions, but I will still do them to the best of my ability. I will also need to define each term and explain exactly what it means. For example, with “UI” I need to identify that it stands for “user interface”, I then can break down what it actually means. Overall, I need to be able to define and clearly show everything I’m using and researching.
Mood Boards
For the mood boards I want to get at least 20 different mood boards for different parts of my work as it will show that I have a good understanding of everything in my work, and I can explain it all in depth. I will firstly place 4 – 5 photos of the theme of that mood board and will annotate them accordingly. This won’t take me long to do and is something that I will need to be able to complete relatively quickly. For example, I’m going to make some mood boards dedicated to the different universities. So, for this I will get 4 photos of the university (maybe 2 of accommodation and 2 of other things around campus) and will annotate them accordingly meaning that I will explain everything going on. Let’s say I did accommodation. I will write about the good quality beds / rooms etc. Overall, this is something which I should be able to complete relatively quickly compared to the rest of the work that I will need to do. However, I will spend most of my time doing this as I have so many to make.
Concepts
For my concepts, I will be creating different variations and different designs for a website that I’m going to code. These should take 20 minutes each at most. They need to be able to be pumped out and something which I can make lots of very quickly. So, I will probably want 3 – 4 designs with their respective accessibility features like light mode dark mode etc. I want to also have a main design which I like the most (I will then make some “sub-designs” which is the same design re-designed again to look slightly different trying to keep the same theme). Overall, this is also something that shouldn’t take me less then an hour and I will be able to pump lots of these type of images out quickly and efficiently.
UI
UI also known as user interface, is something that everyone uses in their daily lives. Your phone screen. Airport screens. Even down to your microwave screen. UI is everywhere and you couldn’t go one day without looking at even a glimpse of one. Now there is multiple different types of UI in fact there is 8 main ones that people use every single day. To start the list, you have GUI or graphical user interface, this type of interface is the most common type of interface and is usually used for icons, buttons, menus, etc. It is also found in most operating systems that you also use every day. That being windows, MacOS, etc. Overall, GUI is the most common UI and one of the best, it’s simple. Easy to create. Easy to use. And it’s overall some of the best design we have ever created.
Next up is CLI also known as command-line interface. This is less common, however used by a lot of people’s computers every single second. CLI is defined by the user typing texts / commands into a computer system, this is most commonly used by developers and system administrators as they know the commands off by heart and can do the most with it. They will most likely use this for easier control over precise operations. Overall, CLI is very crucial in the UI world and is something that I believe more people should get into, as when you start it’s something that you can learn and be able to get the most out of your pc.
Next on the list is VUI, this is more common then CLI but less common the GUI. VUI or voice user interface is an interface which we cannot see however we can hear and speak to. More commonly this can be defined as “Alexa” which has seemed to become more popular in the coming years. Another use of VUI is “Siri” which is on iPhones and macs. They allow you to speak to them and they can give you an output based on your input of your voice. This is something that a lot of the time is used for better accessibility however, it has seemed to arise in popularity due to the fact it can do a lot more then it could a few years ago. Some of the new generations of “Alexa” have screens on them so you can track certain tasks. Watch your house while you’re gone. Etc. Overall, I believe that VUI is something that is going to be some of the best UI design in the coming future and will be used a lot more then it is currently.
Next up is MDI also known as menu driven interface, this is one of the older interfaces that has been used for a while. This usually isn’t very commercial for the public however a lot of people still use it. This interface gets interaction from people pressing physical buttons to control the screen. This can be seen on a lot of ATM’s and older phones too with the physical home button and the ATM buttons to deposit, collect and withdraw money. This type of interface is slowly becoming more obsolete as we have figured out how to make a lot of technology disregarding of physical buttons. Overall, I would have to say this was some of the best UI of its time and it was amazing and revolutionary when it was first created. However, like most things we found another alternative which is 10x better.
The next UI that I’m going to be covering is called touchscreen user interface. Which is what was after MDI as I covered last. This is the technology which overtook it and became its successor. This technology is mostly used for touchscreen devices which a lot of people are using now. Most of touchscreen technology can be done by the same few actions. e.g. Tapping, swiping and pinching. The list is almost endless with the number of combinations you can use with this technology. Overall, this is something that we have developed for along time and will more than likely be the standard for technology leading onwards.
One of the final UI’s that I will be covering is called Form-based interface, this will present the user with a form that they need to fill out and complete. This can most commonly be seen in the sign in page (which most people have used). It can also be seen in some of the settings pages that we use now. It will require the user to fill out a form. This can be anything from something simple to a whole block of text with questions that they need to answer. Overall, I feel that this is one of the less commonly known UI methods as it isn’t used as much and isn’t talked about as much. A lot of the time it can be under the GUI section and miss heard.
The second to final UI that I’m going to be researching is called, Natural Language Interface. This is a controversial UI as it tries to understand human language to output an answer. This can most commonly be seen in “chat-GTP” and many other AI software’s when they try to imitate a human this technology is controversial as it is seen as “creepy” to a lot of the older generation of people trying this technology. However, it can come with some very high benefits. E.g. we can already see it being used in support chats, being able to talk like a person while the human operator is already busy. This can help traffic as they could solve small issues on their own. Which will mean less work for a lot of people and quicker response times when we need something fixed. Overall, I feel personally that this technology is the future of tech and we need to spend a lot of out time trying our best to improve it. However, I do also think that it could have its downsides as if people do use it for the wrong reasons, then it could become something quite concerning.
This leads us onto the final type of UI which is a two in one. AR or augmented reality. And VR or virtual reality. These are both very similar which is why I have placed them in the same paragraph. Let’s start with AR. AR is meant for placing virtual “objects” into the real world. This can already be seen with “Oculus” headsets as they have a “pass-through” mode which allows some elements to be seen in person. This technology is very new and hasn’t really advanced as much as certain other tech has in the past few years and it’s been on a steady increase for a while now. Overall, me personally I feel that AR is something that isn’t going to be as big as other UIs in the future and I see it as more of a “gimmick” than anything else. Next up is VR. VR is something that instead of placing certain objects into the real world. It replaces everything in the real world with playable space. This can also be seen by the same “Oculus” headsets which allow the wearer to play games. As of right now the technology has also been slowly improving and getting better but it has started to implement its way into real life and creep into more mainstream applications. Overall, I think that this is a lot better than AR as this can be used to explore a scene and get into places where you are not supposed to be in. This is also something that can be tweaked to use in the real world and I feel that it has a lot of purpose in the future.
Overall, UI is one of the best ways that humans have created viewable information. And I think that it should be something that everyone has to learn and attain knowledge on, as when you get into researching it and how it affects us daily is can really help people understand how much we have changed and evolved. For me I believe that the Natural language interface is the best way for us to expand into as, I believe it holds the best opportunities for us and can lead to some amazing things in the future. I also think that the downsides can be very easily mitigated and controlled if we do it right, all it takes is the right people to make the right decisions and it can go a whole lot further then it is right now. I also believe that MDI is the worst interface. Not because it is bad. However, I feel that it has just aged poorly and is getting less and less used as we move to more touchscreen applications and devices. It was still one of the best inventions of all time. However, it has been quickly replaced and dominated by the other competitors.
UX
UX also known as user experience, is something we use in programming and web design / development, when we want the person who is viewing the website to go exactly where we want them to. In definition a good UI will have a good UX as you cannot have a good UI without a good UX. However, you can have a good UX without a good UI. For a good UX you must be able to clearly direct the user to exactly where they want to go. Your design needs to be so good that they don’t have to think where they click. It should be automatic for you to instantly click and know where you’re going. If you go to any website now you will find that you know exactly what to do (most of the time) this is due to the fact that they will have a good UX. There are several types of UX specifically 3, and I will be getting into all of them.
Starting off with Interaction design. This is the most common type of UX as it determines how easy a person can communicate and press certain buttons on devices in person (mostly physical products) this involves the person pressing a button on a phone to power it off. To turn the volume up etc. Most actions that you complete in daily life will more than likely be interaction design. Overall, this UX is pretty basic and self-explanatory its one of the best made and it is still very popular to this date.
Next up is information architecture, this type of UI / architecture is made to help structure content of a page for a user to easily be able to find information and complete tasks. A good example of this can be a side bar of a page. It can tell the user where they are and what else they can look at on the same page. It helps define where everything is located and the person should be able to navigate without having to think about their actions. This form of UX isn’t going to go anywhere anytime soon as people will always need a way to organise information on a page / document. Overall, this is one of my favourite UX design features, and I love to do it myself. I find it so satisfying when everything fits so perfectly.
Thirdly and the last part of the 3 normal UX uses visual design. This type of design is meant for the aesthetic of a product which includes the colour, topography and imagery. This is meant for appeal (a lot of older websites lacked this as CSS wasn’t commonly used) when people use visual design, they try to make it either look really good that you want to stay there. Or they make it appealing for your brain, so it makes you want to stay. Either way the UX artist has thought about everything to try and make you stay on the site as long as possible without distraction. Overall, I feel that this UX is very hard to make good and effective, as the person needs to be able to stay on the page for long enough that they get hooked and stay longer. Which isn’t easy to do or design.
Overall, UX design is very hard to implement into UI, and it needs someone who has very good designing skills that they can fit into the already existing UI. I feel that UI and UX are things that we will always have to design ourselves, even if eventually AI takes a lot of peoples jobs. UI / UX is something that will always need to be reviewed if we actually want to progress down the line of good consumerism. If we make everything human, we will get a human reaction back.
VSCODE
VS Code can only be defined by amazing; it’s a free software developed by Microsoft and is made for users to be able to edit and manage multiple different languages of code at the same time. The user can freely switch between different languages in seconds and add that to a project. Its GUI is fast. Responsive and accurate. It has a number of tools that help the users experience of coding (which can usually be a daunting task) a whole lot better. It has a quick installation and with that you get a number of features. E.g. built in GitHub support so you can push branches out and directly edit code. It has thousands of different community-made and commercial “extensions” which enhance the software even further. It even has auto code completion fully built in the second you install it, so you don’t have to type thousands of words a second to catch up. It works on all OS like Linux, MacOS and Windows and they all have the same exact support and player interactions. Overall, VS Code is one of the best software’s I have ever used, and it can make someone’s time coding so much better to the average person. I would recommend this program to anyone starting or even having experience in the coding scene. I wouldn’t change anything about it, and I feel that it is truly great.
HTML
HTML also known as hypertext markup language is known for being the main language to create the structure and main body of a website. The way it works is by using “tags” which tell the browser which piece of content is which. Every “tag” helps organisation and tells the browser how to display everything. HTML alone can’t control a lot and is very limited. However, when it is paired with different languages it can do a lot more. Overall, HMTL is a great language, and it teaches you the fundamentals about creating a website and how to start the structure of one.
CSS
CSS also known as Cascading Style Sheets is used to control the visual elements of a webpage. CSS is used to style the already written HTML, and it is how you can change colours. Add definition to your work and make everything look nice. If HTML was described, I would have to say it’s the skeleton of the body and CSS is the outer skin. CSS makes everything pretty to look at and allows for you to change the location of existing elements made in HTML. Overall, CSS is a main part of coding however it isn’t mandatory to learn as if you really want to you could only use HTML and JS for a “functioning” website however its highly advised you don’t.
JS
JS or JavaScript is a programming language which is often used with HTML and CSS to add functionality to your website. JavaScript is used after you have made your website pretty and it’s all complete. It allows you to give functionality to buttons. Hyperlinks. Textboxes. Etc. it allows for the creation of animations. Popups. The choices are literally endless in what you can make. Learning JavaScript takes a lot of time and requires the person learning it to have a lot of patience. You need to know how coding works and understand the fundamentals before even attempting JS. Overall, JS is a great language to learn however I would learn it a little after learning HTML and CSS as it can be quite hard to get the grasp of in the beginning.
GITHUB
GitHub is an online platform which is used for storing, sharing and managing your coding projects. GitHub itself is built around a pre-existing system called “GIT” which is known as a “version control tool” Version control tool means that you can control and track changes to your code. This means that every line of code you write (after installing) will be tracked. This also means that if you mess up and delete something, you can always just go back to an older version to restart from there. On the actual GitHub platform every project you make will be under a “repository” This is a folder which contains all the files. Code and history of a project. You can upload work make changes and create branches of code to assess different ideas. Which you can then merge back into a “master” branch. A lot of the time, GitHub is used for teamwork as it is very helpful because multiple people can work on the same project writing lines of code at the exact same time. When the person writes a line of code, GitHub tracks it and remembers it so you can “approve” changes or not. GitHub can also make your “repositories”. Public or private public repositories allow for anyone to edit them and make changes. While private ones allow only people whom the owner invites to make changes (with approval). Overall, GitHub is a great program to use if you want to track a development log of your game. It shows the Reader exactly what they want to see with professional comments and logs from people who have read it.
Dev Diary
For my Dev Diary I will mostly use GitHub which I have already spoken about. However, I will be making a separate file which shows the dates which I made those changes and added repositories. This file will be strictly dedicated to showing when and how I made my work with what program and how long it took me. I have already got some people who I can get to review my work and give me feedback on my work(which I will be making changes to accordingly). This will also help my overall as it allows me to know what’s wrong with my code and change it before it becomes a major issue. My dev diary might be small compared to a lot of other pieces of my work however it has been a long set up for it and it is one of the most detailed especially for lines of code written and how well its displayed. Overall, the dev diary side of things won’t take me long as all I need to do is upload to git whenever I make a change, and it will track everything that I have done.
Overall of the project
Overall, I feel that this project went well, I finished my code, learnt a lot and grew as a person because of this. I feel that I have learnt my lesson about time management and in the future I will strive to change my work ethic. My research was extensive. Different and in my opinion quite impressive for what I usually achieve. I placed a lot more effort into this work and I feel that I have tried my best to achieve what I can in the time given. I have learnt skills like HTML, CSS and JavaScript which I can take with me into my selected career path which will even further benefit me in the long run. For the next project, I believe that I will focus a lot more on my development diary and make sure to expand on this earlier on in the project so I know exactly how and when I will finish. Overall, this project has shown me what I can do not only for myself but I have shown that with the right time I can do anything.
Personal Statement - CV
I am currently studying BTEC 3 Gaming Design at Loughborough College, this is a 2-year course of which I have completed the first year and I started my second year in September 2025. My aim is then to continue my education at De Montfort University to Study Computer Gaming and also take my teaching qualifications. Which will allow me to stay with your company even after leaving college and moving to university.
My long-term aim is to either pursue my passion with a career in Computer UI and UX Design as this is a very competitive market, I have the additional backup of becoming a teacher of Computer Science.
In my spare time I enjoy spending time with family and my Friends. I am further looking to expand my life experiences with a part time job to improve my confidence and expand on my communication skills.
I am able to work Saturday, Sunday, Monday and Tuesday at any time during term time and in holidays I’m able to work any days.
I am happy to work at short notice and cover as many shifts as required as I have a lot of goals that I can achieve and stretch for with this opportunity.
Dev Diary - Resub
Personal Statement - UCAS Application
Question 1 - Draft #3
My original passion for games design and development has been a long-standing interest of mine for many years of my life. This grew from early education, through secondary school, all the way into college, where my love for games development shifted from not only playing games to the creation of them. This is where I became particularly interested in the development lifecycle for multiple games that millions of people play daily. I looked into many games in my spare time and deciphered how they were made and created over the years of production that it took whole teams of developers. Alongside my college work, this is where I started to teach myself games development and the lifecycle of how a good game is created as a solo developer. I learnt how to make some basic level games on my college course using Unreal Engine, as well as Unity outside of college. The point at which my interest became more serious this was when I programmed a sprinting mechanic in Unreal Engine using Blueprints. Implementing this mechanic required me to consider player movement closely. Achieving smooth and precise movement helped me understand how mechanics affect player experience as a whole.
Question 2 - Draft #5
Studying at Loughborough College has given me a really good foundation for my future, as I have learnt a great deal about the games development cycle and how game creation works. Over the two years I have studied at the college, my knowledge has significantly increased, and the way I approach and complete my work has changed due to the professional standard of the course. We used tools to develop games and programs across multiple projects, requiring us to learn and apply new skills within short timeframes. Most projects lasted between six and eight weeks, which required strong time management and the ability to adapt quickly under pressure, closely reflecting an industry-style working environment. During my A1 project, I created a full medieval town environment in Blender, which required me to plan and produce all assets alone. Managing the creation of these assets helped me develop an understanding of asset creation and consistency, which are essential skills for building games. In particular, learning Blender within these time constraints helped me understand the full work of creating game assets, turning it from a hard tool into one of my best areas and making me ready for asset creation within games development.
Question 3 - Draft #5
Through independent learning, I started using Visual Studio Code (VSCode). This was to experiment with different coding languages outside of my college work. This then led me to teach myself HTML, CSS, and JavaScript, which I learnt and applied within a short period of time before starting one of my main projects. Using these languages, I created and published multiple websites using CloudFlare for people I know, which has benefited them in many ways, as well as working with like-minded people on more advanced coding languages to expand my knowledge. This in turn has boosted my love for programming and development and has given me some practical experience working in a team of different developers. I have also learnt how to use Git, from knowing absolutely nothing about it before to having a better knowledge of how it works. I mostly used this software to track and review my work so I could gain perspectives from other people outside of my circle. I have published multiple lines of code on Git and have had countless reviews, which have helped me become a better programmer independently. I have also started to learn the macOS Terminal, which is a simpler but very effective tool to use and opens up a whole new world of opportunity for me in my coding journey. Overall, these new experiences have really changed my perspective on coding and how I should present my work to people who have more knowledge than me. I believe that all of these outside experiences have really prepared me for university life and how I can adapt to new things quickly.
Dev Diary
title: “My Fourth Post” date: 2026-01-07 draft: false
Development Diary
Pre-submission
Before the resubmission, my B1 development diary was poor compared to the rest of the work that I had produced. It was a lazy and quick fix for one of the major parts of my work and I have now realised this. A lot of my ‘Dev Diary’ was on GitHub and to say that it was lazily wrote would be an understatement. I spent little to no time on these commits and didn’t think much of it, I now realise this and can see that I should have put more effort into this document.
Editing my work
That previous paragraph is why in this document, I will be going over all of my coding documentation to analyse in depth what each line accomplishes. I will Start with the HTML document and work my way down to CSS and then JavaScript.
Idea building
The beginning
At the beginning of b1, I was dead set on the idea that I was going to do blender. This is as it was my strongest point in the course and something that I could easily do. However, upon further research into the brief and how the project worked, I realised that I could do programming. I’m not going to lie and say that I went into this project knowing everything about how to code and how code works. Because quite frankly, I didn’t. All I knew was my passion for coding before college started and how much I was inspired in earlier education. In the beginning days of B1, unlike most of the other students in the class, I was spending all of my time in and out of college learning the fundamentals of how each coding language worked. I had spent my days making miniature websites to hone my skills and try to get them up to industry standards.
Half way
Before I knew it, we were half way through the project. My work was mediocre for research and honestly, I was giving up on myself. The half way mark turned something inside of me, it gave me newfound motivation about how I should go about this. During this I was set on the idea that I was going to be making an AI embedded application with multiple coding languages, this obviously didn’t turn out well, as it was too complex for me at the time. This was also when I started to think of new ideas for this project, I went through a few drafts of designs however, none found me as best as making my own portfolio. Around this time was also when I started my coding, I started to make the basic fundamentals of my website. This process took me a few days to perfect as it wasn’t my best code, however I was happy enough with my design.
The break - The end
Over this period of time, the winter break started this signified the last 3 weeks of the project. This in itself was good for me, I could stay home and work on my code the entire time to perfect it to my likings. Admittedly, a lot of the holiday my work ethic was rather poor compared to a lot of the work I did in class. I had my mind set on the AI writer and my code was basically completed from this point onwards. Then the day after Christmas Day I had been saved by the fact that I now have the use of a MacBook. This allowed me to work even when I was out, which is a big game changer especially since my work ethic is usually pretty bad. This break allowed for me to reset and get use to all of my new resources. Overall, this break helped me in the long run as it allowed me to reset my mind from the stress of B1 and it additionally allowed me to work in my home, which is a way better working environment for me.
HTML
Lines 1 - 16
Lines 1 - 2
The starting two lines are mostly used for the browsers. They tell the browser that the website it pushed to that the document used is HTML format, this is mostly for accessibility and ease of use when looking into the code and checking format. The second line is another accessibility line of code, this line defines the document as an english document. This feature is used by a lot of browsers for recommendation. It will push your file to people in the same language, this feature will mostly used for ‘screen-readers’ as it can tell the reader what language the document is.
Lines 3 - 12
Most of lines 3 - 12 have the same purpose. However, I’m still going to go into detail about everything I can, and describe it well. The first line(line 4) being ‘Head’, this tag defines everything below it (and up to the next head tag) in a ‘Header’ this tag will mostly be hidden unless users specifically look for it and it will only affect background tasks.
Next up is the start of many ‘Links’ this first link(on line 5) uses ‘rel’ as the first main tag. This tag is for accessibility and is used for screen-reading whenever someone scrolls over the image. Upon scrolling over this image it will say whatever is in the ‘rel’ tags, in my case ‘icon’ will be told to the reader.
Going further on this line, I can see that is displays ‘type’ this is to define to the browser the image and what type of image this is(which can be anything from JPEG to PNG).
Next up is the HREF tag, this particular HREF is stating what the file name that it needs to reference is called and named in the folder. It is referencing something called a ‘Favicon’ now. If you’re not very familiar with coding ‘Favicon’ could mean absolutely nothing to you and could seem daunting. However, this is simpler than expected.
Favicon
Favicon can seem daunting, and maybe not the easiest to understand. However, I’m going to try and explain (in the best way that I can) how they work / operate. The best way I can describe favicon is by saying it is a small image(usually 32px by 32px) which operates from the top of your browser. If you were to open a web page now, you would be able to see the image of the page (the favicon) and the name of the page next to it for example Google. This would look something like this:
Overall, a favicon is an interchangeable image which can be changed with a simple line of code. This image is usually used for main logos on pages used by a lot of people, they are quite often then not a piece of art which is only displayed on the top of your browser window. They are usually unnoticed to someone who isn’t looking for it. The creation of a favicon should take no longer than an hour and is something very simple. Here are some examples of some popular favicon’s:
Lines 3 - 16 Continued
The next line(line 6) is also a ‘Link’ line of code, and is also a link for a favicon. This line also starts with ‘rel’ and is also defined as an ‘Icon’. So far everything in this line of code everything is the same as the previous line, which is what you will notice throughout a lot of the ‘Head’ section of my work. This slightly changes for the next section of code, the HREF stay the same by linking the same image, however the size at the end of the code isn’t defined. I had a lot of trouble trying to figure this line of code out as the favicon weren’t working before. However, after removing the size it fixed everything. If you were to ask me how this worked? I couldn’t tell you fully. However, my theory is that the picture needs to be in its normal size for at least one line of code so it has a basis to go from when converting the size down in pixels. But thats just my theory, as I couldn’t find anything directly explaining why this happened. Unfortunately, in a lot of coding this is also the case with most people lots of people all over the world have the same problem as me, they can’t explain why the code or program works. But, for some reason it does and it will run fine.
Lines 6 - 8 are all the same thing again, I don’t want to write too much about every single line of code when half of it is doing the same thing in a different font. These lines of code are specifically for other browser types to keep accessibility rates high. Overall, the code lines are still mandatory if I would like to display my website across multiple platforms and devices(which I would like to do as it could increase my overall viewership for my website). So, in the long run these lines will benefit me. However, for explaining purposes I would be dragging it on for useless lines that I can’t explain much more than I already have.
Now, I can get into the more advanced pieces of my work, The 9th line is a ‘meta’ tag in the project I used this tag once. Honestly? That was poor practice. Meta could have been used a lot more. This tag is mostly for accessibility as well as the links tab, however it works slightly different and it can hold certain content in the meta tag. This specific tag defines an app name(on apple devices) so when the app is on the Home Screen it will display the application name with the favicon. The line then has a ‘content’ tag this tag tells the browser that whatever is inside of these quotation marks is what will display when the application is on the home page(of an apple device). Let’s say I put ‘Google’ in the quotation marks, then when uploading the website ‘Google’ would appear below the favicon. Overall, this meta tag is crucial for when I could upload my website to a downloadable application on devices.
Line 10 is another ‘links’ line for the same favicon to be displayed on google devices. Im not going to go into detail on this line as I have already explained the ‘link’ section too many times.
Line 11 is a ‘title’ tag, I had a lot of problems with this tag as I couldn’t quite get it to function properly. Sometimes it would display incorrectly or sometimes it wouldn’t display at all. Eventually I had to ask one of my classmates for assistance which they then told me what I was doing wrong and how I could fix this. In short, before I was defining it with a class tag, and that class tag linked to something else in my work. So in theory it was working but it was displaying with the class, which isn’t where it needs to be. All I needed to do was remove the class tag and my code would have been perfectly fine. I then wrote down his answer and looked into this more when I got home. I found out that you don’t need to define it at all. This is what I found out about ‘Title’:
- 1: located in the head tag, so it can be a separate variable in itself
- 2: I don’t need quotation marks around the text inside as it’s a variable in itself, so everything in-between the two ‘title’ tags would appear as the title
- 3: I don’t need to over-complicate the code.
All of these points coming together gave me a higher understanding of how this, and a lot of other code works. As most of the skills and features of this singular line can be applied everywhere else in my code for more practical use.
Next is another ‘link’ line. However, this line is a lot better for explaining. Plus. It has a completely different function than the previous ones, it starts with a simple ‘rel’ and in the quotes it states ‘stylesheet’ this is pretty similar to the other lines before in the fact that it is used for accessibility and screen-reading. However, the better part of this comes in the next small tag. The HREF tag references the ‘Index.css’ file and links the two together, so the browser knows that everything past the link will be linked to the CSS document. Overall, this line of code is essential to making the code:
- A: look nice and feel professional
- B: Actually run
- C: Align all of my elements into their own separate parts
Without this singular line of code, the website wouldn’t function and it wouldn’t run nowhere near the ability that it could before.
Finally, lines 13 to 16, this function is something relatively short. Upon first glance, it looks a little more complicated from the rest of the code before. However, on further looks and descriptions on it, it isn’t that daunting. To start off line 13(and 15) we have a style definer, this definer sets everything in-between both style blocks to be added onto the stylesheet which is predefined. Next up, is line 14, this is the bigger chunk of code and can be easily explained. ’@import’ This command is as the name says importing documents from elsewhere. This can also be used for various other things than how I’m using it. However, this was the best way to do it for me. For the final chunk of this line ‘URL(Fonts)’ this is linking to that google fonts link and taking the code for it. What this will do is allow me (in CSS) to define everything under this font instead of the basic ones which VSCode allow. This is very helpful for using precise fonts to make websites stand out from everything else. Which is particularly good when trying to make something look professional and presentable. Overall, these lines of code define such a small but necessary part of this document and they help with making the entire website more professional, and more presentable.
Overall, lines 0 - 16 are some of the most essential lines of code for not only looks, but making the actual code run and function the same as it would normally. These important lines define the whole document and display perfect accessibility to people who can’t even view the document properly. These lines of code show some of the best practice that I have achieved out of all of my personal project at home and I feel that I have honed my skills perfectly here.
Lines 16 - 40
Short summary
Lines 16 - 40 are some of the more basic lines of code, in short. These lines define some of the ‘Main Features’ of the website and page. Some of these lines of code define smaller things and others will define whole paraphrases of text.
Lines 16 - 40
Starting at the very top line. Line 17, this line is the beginning of the ‘body’ tag. This tag defines (whatever is below and in-between the other body tag later down the code) everything below it as something which is located in the ‘body’ of the website and code. Before moving any further I feel that it is necessary for me to explain the layout of a generic website.
Website layout
To begin, its best I show an image of a websites layout so referencing will come from the image below:
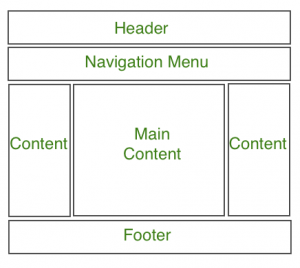
Header
This tag defines everything at the top of the page, this may contain things like the websites logo, the favicon and slogan of a page, by base. This tag works like a normal ‘Div’ which I will explain later on in lines 16 - 40. You can easily spot most headers on websites as it is the first thing that you will usually see. Some examples of really defined headers include:
As seen in this image(and highlighted in red) you can now see the entire header section. In this example, the header is a small bar at the top of the page, it can be seem with multiple functional buttons on this. I have confirmed that this is the header tag by looking into the code itself (using inspect element). Further looking into this website I can confirm that this is very bad practice (in my opinion) if I was creating this website I would much rather place this top header in a ’Nav’ tag. Overall, this example is good and shows you how to not use the header tag. However, it does give us a good insight into how headers work and function, which is the entire point of this paragraph.
Nav
Next up is the ‘nav’ section of my work. Nav(aka navigation) is a fundamental part of every website posted onto the internet. In short, nav allows the space under the header to be placed with multiple buttons which help you navigate around the website. This bar is mostly seen at the top of a website and used at least once in a websites creation. Some examples of ‘nav’ bars in websites look like this:
This image is a perfect example of how to use the ‘Navbar’. It is simple, fast and effective. Additionally, it is used in the perfect way as it isn’t like the last one which was using a ‘head’ tag when it should have been using ‘nav’. Overall, I have nothing to say for this image and it speaks for itself. I love everything about this ‘navbar’ and wouldn’t change anything about it.
Content
The content section of a web page is usually used sparsely, in modern website content can be seen being used less and less. In A lot of low budget websites, content is used a lot more for ad purposes. You will find, when scrolling random pages on the internet, their content tabs are rather large and seem to take up a lot of space around them. Some popular examples of this can be seen:
This example is a very old website called Wikipedia (no I haven’t cited from it) and this is a prime examples of old websites using a bigger content size on the page. They have a large variety of different buttons and functions on the side of the page. In theory, this was more practical and personally I like the bigger content, as I feel that it gives me more to see in the centre of the page. However, due to the popularity liking the smaller and cleaner content side it has started to disappear and blend into more websites. Overall, I feel that the content part of the page is something amazingly useful I just feel that now websites should take that and use it more.
Main Content
The next part is the ‘Main Content’ part of the page, this section of work is something that everyone has seen regardless and is usually located in the centre of the page. When you open up a webpage most of the time you will be fixed on the main content. This is why, when creating a website you need to focus on the looks of the main content, so when a user is looking upon your work they will be enticed to stay on the page longer. Some examples I have found are:

This image shows exactly where the main content part of the page is. Not to be confused by the image next to it with a description as it is a part of the content section. I like this main content as it shows me exactly what I want to see on the page. In my opinion I feel that main content now is being used as a side part of the page instead of the main part of it. I believe that the looks are better and its feels easier to read in this format and is why I will continue to base my formatting from it. Overall, I like this formatting and the way of showing the main content of the page as I believe it is the easiest way to display work.
Footer
For the final part of websites that I’m going to go over, I have the footer. This part of the website is something which is used to display a lot of the information located on the bottom of a page, this can display peoples other platforms e.g. Youtube, X etc. sometimes the footer will even show things like legal information and copyright information. Like a lot of the other parts of websites, the footer will be something that won’t disappear or fade out of popularity anytime soon. This is as the footer hold a lot of information about a website and is the standard for web creation now. Without a footer a lot of legal troubles could come for websites and recognition could also be a lot harder than if they weren’t using one.
This image displays the entire footer for the ‘Apple’ website. Apple is one of my favourite websites when it comes to web development, I believe that they have some of the best UI and UX elements out of any company I’ve seen their sheer performance of modern integration is just amazing to look at and I would love to work on / for them. Whilst looking at the footer I instantly noticed the sheer size of it. Upon reading more of it I can clearly see everything that I need to and it displays everything to me perfectly. I love the design that they have gone for this footer, as when scrolling it is all centred on the page and nicely organised to meet my eyes when further reading. Overall, this footer is one of the most wordy and advanced pieces of work that I have seen and I wouldn’t change anything about
Overall - Website layout
Overall, creating a website is something which needs a lot of time spent on it, I believe that websites have to have everything I have mentioned from the Content to the footer. Everything needs to be available to be a successful website. After spending a long time looking into websites I can confidently say that looking into all of these different websites could show anyone how to create and design a website.
Lines 16 - 40
After taking the time to explain websites and their layouts I believe that I can now explain the rest of my code and make references to pieces of information inside of those paragraphs.
Let’s start with line 18. This line was something simple, It starts with a ‘Div’ element, and tags into a ‘class’ with text that reads ‘aboutmebackgroundblur’. This was the start of a long few days of me trying to figure out how to blur the background of my website when opening the ‘about me’ menu. This whole ‘function’ took me a while and a few other programmers to help me.
What Div is and What Div does
‘Div’ is an element inside of HTML which is usually known as a ‘generic container’. A ‘generic container’ is something that contains a small piece of information and or type inside of it. Referencing earlier, Div is the exact same as ‘nav’ and ‘header’. However, Div contains the same things with no preset and requires CSS. Whereas, for example ‘Header’ will contain things at the top of the page(by default and can be changed in CSS). Div can also have tags on the end of the text like a ‘Class’ this ‘class’ defines the name of the element (for CSS). Overall, div is one of the most used tags in HTML development, and if you were to look on any mainstream google page I guarantee you could see a long list of Div elements. I believe that ‘div’ is one of the best tags you can use and it has so much CSS potential.
Lines 16 - 40
Next is line 19, this line of code is another ‘div’ with two elements attached to it. These being ‘Class’ and ’Id’. Class is something I have already covered in a previous paragraph which is something that you can use to define a pre-existing element as a named variable. Id on the other hand is something that I haven’t gone over, Id is another way to name a variable however when referring to it. Then it can be called something else in the CSS so technically speaking if something had a class and an id then it could be referenced twice in the CSS document for two separate variables.
Lines 20, this element is called ‘H1’ in my code you will see a lot of ‘H’ elements. ‘H’ is used a lot of the time to define wording and usually titles. The ‘H’ being ‘heading’ and the ‘1’ being, the size(1 being the largest and 6 being the smallest). They are usually for when things are classes as ‘important’ so titles will be H1 - H2 whereas slogans and subheadings will be H5 - H6. This text also has a ‘class’ variable, and has some text between the two ‘H’ tags. When looking into the CSS I would rather use a ‘Class’ so I can use CSS easier.
Line 21, this line is a different one from what we have looked into before, this line of coder is ‘img’ this is an abbreviation of ‘image’ and all this line does is reference an image using file linking. For the next part ‘src’ this is a file linking type and it is used to links files by their file type. Example ‘image.png’ this would link the file which has the same name (and is in the same folder) to the line of code, so when this line is implemented in it shows the image. Next up is ‘alt’ this part of the text is for accessibility and screen-reading everything inside of the ‘alt’ tag will say to the screen reader whatever is inside of the speech marks. For the final two parts of this long line of code, we have class. Which I have covered (used to name things for easy use in CSS). Finally, we have a new element, called “draggable” this element is pretty self explanatory and is mostly used in CSS. This stops users from dragging the image accidentally and messing up their work. Personally I like this feature as it makes the code seem so much more refined. However, a lot of companies don’t use this feature. Overall, the IMG line of code is something simple but very effective and accessible.
Line 22 - 27 - Paragraph Tag
Next is line 22 - 27 is all the same thing (hence why I’m doing this whole section devoted to that and why I won’t be mentioning this tag again and reference back to this), lets begin on discussing what the ‘p’ tag actually means. The meaning of the ‘P’ tag is an abbreviation for the word ‘Paragraph’, this ‘P’ tag is a holder for text in a website. Most programmers use this element for holding paragraphs of text. This tag is very similar to the ‘H’ tags we talked about earlier, whereas this tag comes with a different preset of variables. ‘H’ tags(with no CSS) are big and bold text, whereas, ‘P’ tags are small and light(small text width and boldness) straight from inputing the tag. This(of course) can be changes in CSS later on for customising, however, ‘P’ is mostly to be unchanged as the present(unlike certain variables) is rather good. Overall, the ‘P’ tag is one of the most used tags in all of HTMl and CSS history as it is an essential function for websites to display information to the client.
Lines 28 - 35 - Button paragraph
This is another huge paragraph about elements which all have the same function, I will be linking back to this paragraph later on in my development diary. The element of the code is called ‘Button’ and this tag is something very self explanatory, it creates a button where if you click it(without any prior JavaScript which I will get into later) it will hand out a function. The button will be named based upon the text between both buttons. Next up is the class tag, I have already explained the function of this tag in depth in a previous paragraph, however, it is something that can name a variable for later CSS adaptations. This next tag is something that I haven’t explained at all before. This variable is called ‘onclick’. Again. This variable is self-explanatory, on the click of whatever is being defined it will carry out the function in the speech marks next to it. One of the final pieces of this line of code is called ‘location.href’ this is an extension of the ‘HREF’ element which I discussed before where it will refer and link to whatever path is placed between the two elements. In this case, links to personal websites. This command was used inside of my ‘About me’ section of my code which I mentioned in an earlier piece of my development diary. Second to last, we have ‘type’ this command is another accessibility command for screen reading, whenever someone hovers over the button, whatever is in the ‘type’ tag will be said to the screen reader. In this case, I have defined that as ‘button’. Honestly, I should have done that better and made it ‘home button’ etc, however I did not, which I am disappointed in myself for not doing. Finally, we have ‘color’, this is the most self explanatory part of these lines of code, and all this does, is change the colour of a website. (Also, I know I used the American spelling of colour, but in VSCode, it is an American application. So the use of color, is mandatory and is the reason why I have used it here.) Overall, these few lines of code play a big role in the presentation, colouring and type of button that this line of code plays.
Lines 35 - 40
Line 35 is a continuation of the last line of code and has pretty much no impact on the further code. Line 36 is where it starts to get more function based and important, not like the previous lines of code I have covered. The initial element is a ‘Div’ which I have covered multiple times in multiple paragraphs previous to this. However, a ‘div’ tag is something that can be used to further the production of CSS later down the line, it defines everything in it with ‘div’ instead of being nothing. Then it leads into a ‘class’ tag, which is another way to name something for again later CSS additions. Then, it gets onto a variable that I haven’t explained yet. This variable is called ‘style’ this tag works like CSS however, it has some features which CSS doesn’t, plus, it embeds it into the HTML so the HTML file (for that line) doesn’t have to call the CSS file. This line ends with an ID tag, which is another fancy way of calling the line a class. Overall, this line is rather insignificant, however, in the long run this line contributes to so much more than it’s originally worth.
Next up, is line 37, this is the final line of major importance before the ending 3 lines for this section of work. This starting element is a ‘button’ element, this element is as simple as it sounds and is the same of how I explained it before in the button paragraph(Im not going to go over the definition again as it is 2 paragraphs above it). It then goes onto an ‘onclick’ variable, which is something that when you click(whatever is under the variable) it will output a function, this time it is different. For this line it actually output a JavaScript function, and it calls it with the ‘hideaboutme()’ function name. This will call the JavaScript file and find whatever the script says inside of it then, executes it. I will go more into depth in the later ‘JavaScript’ paragraphs explaining all of my JavaScript code, however for now I will leave it at calling the function. Next up is a class variable, under the name ‘aboutmeX’(I know my naming is bad and I’m trying to work on it, this is something that will be fully addressed and changed later on) this will then be edited in CSS. Next is another element inside of the pre existing element. This is the ‘IMG’ element and this is displaying a small cross on the button. There are easier ways to do this. However, due to the time restraints, I did not have the time to optimise this website as much as I would have liked to. After the ‘img’ this is then followed with the ‘alt’ which is what I explained before, accessibility for screen reading, and for this I believe that my ‘alt’ text was quite good and self explanatory. This was then closed with the final variable ‘draggable’, this made it so the picture couldn’t be dragged off the page when clicking on to it. This was to prevent mistakes. Overall, so far this line has been the most important in the code, and some of the hardest for me to code myself, I spent a fair amount of time just learning how to do all of that for that singular button which will be looked over. However, I feel that it was worth it in the end as it looks good enough to present.
The Next 3 lines aren’t something that I should be explaining. However, I feel that I haven’t gone too much into depth about closing tags so I’m going to place that paragraph here. Lines 38 - 40 involve 2 ‘/div’ tags. The slash is necessary for closing tags. This makes it so the code can tell the difference between an opening tag and a closing tag. I used this twice here as both of the ‘div’s’ before this had not been closed(on purpose) this was then resolved by the implementation of the two ‘div’ tags. Overall, these lines seem silly and unused. However, they are needed for closing code, and giving good coding practice / presentation.
Overall, lines 16 - 40 are some of the most defined and visible lines of code in the whole website, and I believe that without these and their function, my website would have been a whole lot worse than it could have been. However, these were some of the hardest lines for me to code, due to the repetition, the layout and even more so the complexity of them.
Lines 40 - 61
Starting off with line 40 - 61, this is what that chunk of code looks like in VSCode:
Beginning at line 41, this line of code is the start of some of the most important code. This line is a ‘div’ which is something that defines the rest of the line of code(and anything in between the other closing div aka. /div). Overall, this line is pretty useless. However, it is needed for wrapping around the variable that is on the next line.
At line 42 and 43 is where things instantly change. While being inside of the ‘div’ for CSS, these lines starts with a button. Hence the ‘div’ so I can customise the buttons later down the line. Next is the ‘onclick’ variable, these variables are used to define to the browsers when something is clicked it will output a function or whatever is inside of the speech marks. In this case, the variables are linked to a JavaScript function, which calls JavaScript, searches for the function and loads all the lines of code below it. Again. I will go more in depth later in the JavaScript paragraphs. To finish these lines of code off they are both ending with closing variables ‘Id’ this is just to name them for CSS and ease of use later for customisation. These elements are then closed with the ‘/button’ tag. Overall, these lines of code are very helpful as they begin the definition on the website and start to bring everything together.
Next is lines 44 - 48, these lines of code are very similar to what I have covered before so this paragraph is going to be less detailed than paragraphs before it. Starting off with ‘H1’ this tag has been covered multiple times over the last few paragraphs, however I will explain it slightly. ‘H1’ is the ‘title tag’ and is mostly used for big text titles at the top of screens / pages. Next up is a ‘color’ with a hex code next to it. Hex codes are another way of displaying colour to a computer, VSCode can see colours like ‘red’ however, you can still use the hex code equivalent for more specific colours. Additionally, it’s better practice to use hex codes as hex is more computer readable. Then to finish this first line it ends with an ‘ID’ tag which I have gone over multiple times. Line 47 and line 48 are the same thing with different text. They both start with a ‘div’ element, and then end with a class element. However, the difference is what lies within the ‘class’, they both say different things, indicating different CSS than the main body of the code. Overall, these lines of code attribute to everything below it and not themselves specifically, they will play a key role later in the closing of the code.
Up next is lines 49 - 54, this is for the main bulk of my work, and is in the ‘main content’ section, so this section will be seen the second someone opens up my website. To begin we have a ‘div’ element, this specific element will define the middle areas of the website, and I will use it to place all my text within this element and centre it in the middle of the page. The second line in this huge list of elements is also a ‘div’ this element is part of a class called ‘numberlist’ and it will control the number for the auto changing slides with all of my work later on down the line. Most of this process will be done inside of JavaScript. Next up is line 52, this line of code is purely an image line with a class variable. This specific piece of code is under the previous ‘div’ so when this code is executed it will be inside of the element. Second to last is another div, I have explained ‘div’ too many times in this so there is no point in me explaining it, so I will just go over what this specific one does. This div on line 53 is specifically for holding a small amount of text. I could have used a ‘p’ tag however, it would generally be bad practice. Overall, this small amount of code is overly insignificant compared to the rest of the code that I’m going to look into. However, even the smallest detailed in code can mean and do a lot more than people think.
Overall, lines 40 - 61 are mostly the start of the main chunk of code and they show some main features of the website, some lines in this code are necessary for the code to even look good and run.
Lines 61 - 76
Some of the last lines of code are lines 61 - 76, these lines of code look like this:
Im not going to lie, a lot of this image is going to be done in one paragraph. I have explained most of these elements before and their function. I’m just going to be going over what they actually do for the website.
Starting off, with line 62 a ‘div’ element. This encloses everything (in this paragraph) in the single element. This means that, when I change something in the CSS document, It will update everything below under the same ‘div’ element. Next up, is the last part of this code. Mostly because this next tag covers this entire part of the document. However, this tag is the ‘P’ tag, and it spans over an entire page. This specific ‘p’ tag has a few variables called ‘br’ inside of them, this is just a fancy way of saying break in a text(start a new line) which is better practice than using multiple ‘p’ tags for the same paragraph. Finally, the ending two lines are both ‘/div’ tags to close the ‘div’ elements above. Overall, this is the most insignificant line of code that I have gone over so far, and it is one of the easiest to write as all you need to know is ‘p’ and ‘br’.
Lines 76 - 127
These are the last lines of code in my HTML before moving onto the CSS section of my work. These lines look like this:
This image is showing all 51 lines of code, writing now I’m going to be less descriptive with a lot of the code, unless it is something that I have gone over. Starting from the top line 77 this is a ‘div’ element which is the container for the entirety of the ‘middlebar’ this is somewhere inside of my code which has two arrows located on it. This line will wrap around both arrows and complete the code. Next up is, lines 78 and 79. Both of these lines are the same thing just for a different named variable. They are both button elements with an ‘onclick’ function linked to them, this ‘onclick’ will call to the JavaScript file and execute the function. After this is line 80. This line is self-explanatory, it’s a closing ‘/div’ tag and it wraps around both of the previous buttons to enclose them inside of the ‘middlebar’ div.
Continuing from that line, this line(81) we have a ‘div’ element with a class tag of ‘bottombutton’ this (obviously) names everything below and in-between the two div tags that they are within the ‘bottombutton’. Next up is the actual functional button itself, this button (upon being pressed) opens the ‘downloadmenu’ which is a function inside of JavaScript (something I will get to later). Finally, line 83 is a closing ‘/div’ tag, this tag will close the ‘div’ element holding the ‘bottombutton’ class.
Next up, is a huge paragraph this is the ‘div’ all the way from lines 84 - 124 (which is most of this part). Starting off with line 84, this is a ‘div’ element with both a ‘class’ and an ‘id’ variable inside of it. This elements only purpose is to serve as a ‘pop-up’ inside of the website that upon clicking a button it will display on the screen. Line 85 is a ‘H1’ tag for a title, this is also within a ‘download heading’ ‘class’ variable. Next up is a new tag that I haven’t gone over yet, this tag is called the ‘a’ element. The ‘a’ element is described as ‘referencing a hyperlink’ so when using the ‘a’ tag it works like a normal ‘p’ tag. However, if using hyperlinks it’s better for professionalism, which is why I used this over the ‘p’ tag. This specific ‘a’ tag is linking to a blender file, so when someone clicks a button it will send them to downloading the file. Line 87, this is a traditional button element, all this does is contain a button and keep it under a class. The next line(88) is another easy one, this line is just for closing the ‘a’ tag, by using ‘/a’. Line 89 is a ‘p’ tag which is holding information about the blender file (hence why its below the blender download button) there are multiple ‘br’ tags inside of this element, this was for styling purposes. I could have done that inside of CSS however, it used less lines of code to put it inside of the HTML. Line 90 is another ‘a’ element, this hyperlink is referencing a word document download and it downloads then closes instantly. It also has a ‘draggable’ tag, this is so when clicking the button, the user doesn’t accidentally drag the link into their browser. Line 91 is another button tag, this button is for downloading the word document file, and upon pressing this button the download menu will close and the user will download the file. Line 92 is self-explanatory again, this line is a closing ‘a’ tag and ends with ‘/a’. Line 93 is a little different, it is an opening ‘p’ tag, however, it has a style tag next to it this means that everything between the two style tags change and overwrite the CSS. This then goes on to be a normal line of code with ‘br’ etc. Line 94 is an ‘a’ element, this element is for downloading a .mp4 file and is used for the video of all of my work. This then of course has ‘draggable’ as well, simply for user error. Next is line 95, this is a simple button, however, it has a ‘style’ element to it, just like its parent variable, this also means that it overwrites the CSS. Line 96 is another closing tag for the ‘a’ variable, I have explained this before. It looks like this ‘/a’ and closes the variable so everything between the starting ‘a’ tag is inside of it.
Lines 97 - 109 are the same thing I have just explained 3 more times. I could spend a whole paragraph talking about each of their function, but I would be dragging the document on. However, I will say that they are all in the same download menu and they do the same exact thing, the only difference is the wording inside of the ‘p’ tags and the ‘a’ tags. Overall, these lines add a lot of purpose to the code and give it functionality, I just feel that talking about every single thing would get boring.
Line 110, this is the closing ‘/div’ tag which states that everything inside of this will be inside of the ‘downloadpopup’ class. Then we move onto line 111, this line is the start of another ‘div’. However, this ones purpose is for the main bulk of the text on the screen, most things inside of this will be edited inside of CSS which I will explain in the CSS paragraphs. Then on line 112 we have a simple ‘H1’ tag which I have defined lots of times during these entire paragraphs. This specific ‘H1’ tag is for defining the top of a project and giving it a name.
Line 113 is the start of defining a secondarily large piece of content this is a ‘div’ tag and is being used for defining everything under it as a ‘class’. Starting off this relatively big chunk of code. Line 114, this line is dedicated to posting an image onto the page, this specific ‘img’ tag displays an image of my work onto the front page of my website, this is the first thing that someone would see when they login to my website. So ideally, this needs to be placed and dealt perfectly.
Lines 115 - 122, consist of a ‘H1’ tag and a ‘P’ tag, both of which I have covered multiple times. In this instance, the ‘H1’ tag is being used as more of a header than a title. Then, on the other hand the ‘p’ tag is being used for saying about the work in the image and what went wrong and what went right about it Etc.
Lines 123 and 124 are the same thing. They close the previous ‘div’ I have covered this before and they look like this ‘/div’. Overall, these lines are pretty useless except for the fact that they close the main tags.
Lines 125 - 127 are where it gets interesting and different. We start off either ‘Script’ which is a completely new element. This element is linking the JavaScript to the HTML, so when I write in the name of a function, it automatically knows where the JavaScript file is located and where the function is. This singular line of code is necessary for the code to even function. After all JavaScript is mainly used for functionality. Next is line 126, this is the closing ‘/body’ tag, this tag closes the body of the HTML and tells the browser that it has no more HTML let inside of this file left to look at. Without this singular line of code, the rest of the code wouldn’t even run so it is necessary for the website creation. Finally, is the closing ‘/HTML’ tag. This tag closes off and finalises the HTML document. A lot of programmers don’t use this. However, that is bad practice, you should always tell the browser at the start end and end of a document what type of file this is. Overall, these lines seem small to look at. However, their functions are greater than most lines of code in this whole document.
CSS
For CSS I’m going to do something different. Instead of me explaining all of the individual lines of code which would be silly as their is so many repeated values with different texts. Im going to explain all of the CSS variables and what they do.
CSS Explanations
Typography
-
font-family
This sets which font the website uses for all text, which helps keep everything looking consistent and avoids different fonts appearing on different devices. -
font-optical-sizing
This allows the font to automatically adjust how it looks at different sizes, which helps the text stay clear and readable whether it is small or large. -
font-weight
This controls how thick or bold the text is, which I used to help important text stand out more clearly from the rest. -
font-style
This sets whether text appears normal or italic, which can be useful for emphasis or separating certain types of content.
CSS Variables
-
–bgcolor-main
This variable stores the main background colour of the website so it can be reused easily and changed in one place if needed. -
–text-color
This variable controls the main text colour across the site, which helps keep the design consistent and easier to manage. -
–button-main
This stores the main button colour, allowing buttons to keep the same style throughout the website. -
–downloadbut
This variable is used specifically for download buttons so they are clearly recognisable and visually separate from other buttons.
Background Styling
-
background-color
This sets a solid colour behind elements, helping sections stand out and making text easier to read. -
background
This is a shorthand property used to set background colours or images in one line, which helps reduce repeated code. -
background-image
This places an image behind an element instead of using an image tag.
Spacing
-
margin
This adds space around an element, stopping content from being too close together and making the layout feel less cluttered. -
margin-left
This adds space to the left of an element, which I used to control alignment and positioning. -
margin-right
This adds space to the right of an element, helping separate elements horizontally. -
margin-top
This adds space above an element, which helps create clear separation between sections. -
margin-bottom
This adds space below an element so content does not appear stacked too tightly. -
padding
This adds space inside an element, stopping text or images from touching the edges and improving readability.
Sizing
-
width
This sets how wide an element is, helping control layout and alignment on the page. -
height
This sets how tall an element is, which is useful for buttons, images, and fixed layout sections. -
max-width
This limits how wide an element can grow, which helps keep content readable on larger screens. -
aspect-ratio
This keeps elements at a fixed shape, stopping images or popups from stretching when the screen size changes.
Layout & Positioning
-
display
This controls how elements behave on the page, such as whether they stack or sit next to each other. -
position
This defines how an element is placed on the page, allowing it to stay in a specific spot when needed. -
top
This moves an element down from the top when positioning is applied. -
left
This moves an element across from the left side of the page. -
right
This moves an element in from the right side of the page. -
bottom
This moves an element up from the bottom of the page. -
z-index
This controls which elements appear on top of others, which is important for popups and overlays.
Borders & Text
-
border
This adds an outline around elements, helping define buttons and sections more clearly. -
border-radius
This rounds the corners of elements, giving the site a softer and more modern look. -
text-decoration
This is used to add effects like underlines, which helps show headings or clickable links. -
text-align
This controls how text is aligned inside elements, such as centred or left aligned. -
color
This sets the colour of text, which is important for readability and contrast. -
font-size
This controls how large text appears, helping create a clear visual hierarchy.
Flexbox
-
gap
This sets space between items in a flex layout, keeping spacing consistent without extra margins. -
justify-content
This controls how items are spaced along the main direction in a flex container. -
align-items
This controls how items are aligned across the other direction in a flex container. -
flex-direction
This decides whether items are laid out in a row or a column.
Interaction & Effects
-
user-select
This controls whether text can be highlighted, which is useful for buttons where selecting text would feel unnecessary. -
overflow
This controls what happens when content is larger than its container, such as hiding or clipping it. -
transition
This smooths changes like hover effects, making interactions feel less sudden and more polished. -
transform
This is used to move, scale, or rotate elements, mainly for hover and animation effects. -
scale
This slightly increases or decreases the size of an element, mainly used for hover effects to show interactivity. -
box-shadow
This adds shadows to elements, helping them stand out from the background. -
pointer-events
This controls whether an element can be clicked or interacted with, which is useful for disabled or hidden elements. -
opacity
This controls how transparent an element is, often used for fade-in and fade-out effects.
Generated Content & Animation
-
content
This allows extra visual elements to be added using CSS without needing more HTML. -
animation
This applies a repeating or timed effect to an element, such as sliding images. -
@keyframes
This defines how an animation changes over time, controlling each stage of the movement. -
backdrop-filter
This blurs the background behind an element, which helps focus attention on popups or menus.
JavaScript
To begin with, this paragraph will be laid out like the HTML paragraph, where I explain each line of my code and what it does and how it works. Starting with lines 1 - 13, this looks like this:
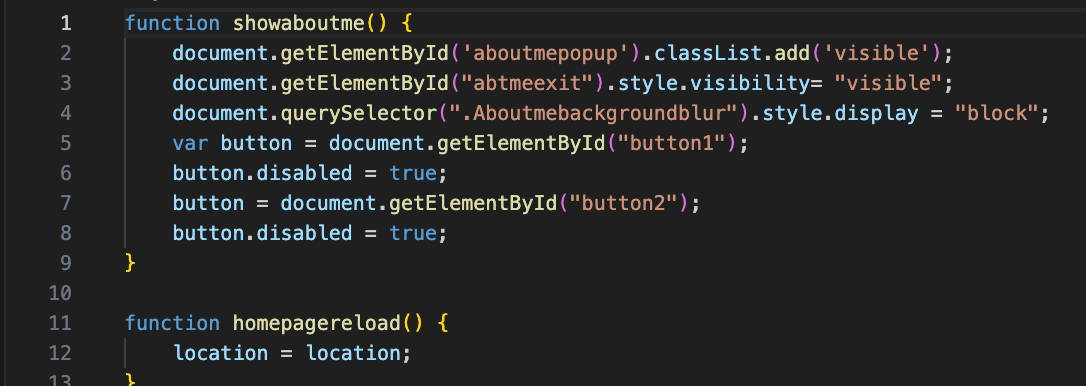
Lines 1 - 13
Line 1 is a function line, in javascript a function element defines the start of a function. Unlike in HTML, the name of the function doesn’t need to have speech marks around it. The second you start typing on the same line as the function that will be the name. This particular function is to hide a variable inside of HTML by changing the visibility tag. Line two is a ‘document.getelementbyid’ element, this element is self explanatory, it searches all documents for a specific ‘id’ tag inside of an element. If it finds the ‘id’ it will execute the function. Line 3 is the exact same as this so I will not be going over this. Line 4 is similar in the way that it uses the same starting ‘document’ however it then leads onto ‘queryeselector’ this is just a fancy way of looking for a class variable in HTML. Which then carries out a function. Line 5 is a newer function, this is a ‘var’ tag (also known as variable) and this tag is responsible for only calling certain variables inside of HTML. For example, this line is calling a ‘button’ now with no further explaining to this code, this would execute a function on the press of every single button, which isn’t what I want. So I used the ‘document.getelementbyid’ variable to search for specifics. This is very good practice as it shows that I’m not over working my code and running lines for no reason. Line 6 is something very easy (and that I won’t be going over again as it is very self explanatory) this is called ‘Button.disable’ and is defined by true or false answers. This variable does exactly what it says, it disables a button inside of the function and the specific one. The next and final ‘line’ that I’m going to be discussing for this specific part of JavaScript, is a button element. This then calls to ‘Getelementbyid’ and selects only specific buttons with that tag. Overall, this function is very important for my code and making sure it runs with actual purpose, and general function.
Line 11-13, I felt that this needed a micro paragraph written about it as if you don’t code this command isn’t self explanatory. Line 11 is simple. An easy function line with a name, which I covered at the start of the previous paragraph. However, line 12 is something different ‘Location = location’ upon first glance this looks like it would do nothing. However, this simple line of code adds more functionality than meets the eye. In javascript ‘location’ is equal to the sites location on the internet, regardless of the URL ‘location’ is whatever it is called. Now the ‘ = location’ just means that whenever the function is ran. The location will change to the location, in turn reloading the page. This line of code is so simple however so effective in production.
Lines 15 - 59
Lines 15 - 59. Honestly, I won’t be going over these lines of code, and this will happen a lot during these paragraphs. This is as this whole function I s doing the exact same thing as the first one, just in reverse. Let’s say for example you have a variable in one function which hides a button, you need to unhide that button later on of course, and for this you need a separate function. This leads to a lot of back-end javascript work being the same thing over and over again which can get repetitive. Overall, those lines of code mean a lot, however for explaining reasons I feel that it is pointless. This is what those lines of code look like:
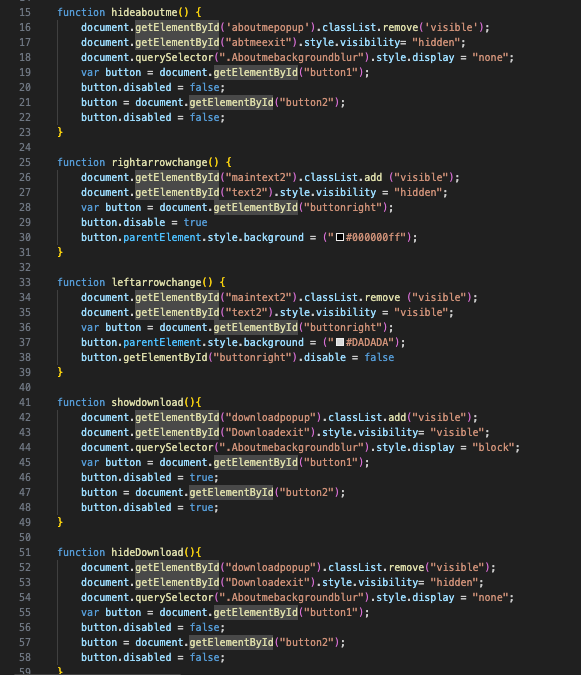
Lines 61 - 74
Getting started with lines 61 - 74, this is what they look like:
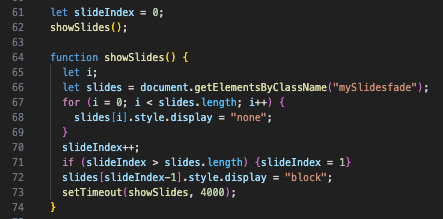
Line 61, this ‘let’ function, is something that I don’t fully understand yet, and it is something that I am still learning. However, what I do know is that this line of code sets a variable to 0 so it can later be changed by some additional JavaScript. Line 62, this is giving a name to the line of code above this one. It’s a very simple line but it gives definition.
Line 64, is where it gets familiar again, this is a normal function line of code and it called to the function created earlier. Then on line 65 this function is continued and called with the ‘let’ function, again, I can’t find very detailed explanations online, all I know is that it defines variables and is another way to define variables. Line 66, is another very familiar one this line of code is like what I have used before, this calls a variable by using the ‘document.getelementbyclassname’ function. This is the exact same thins as ‘document.getelementbyid’ however, instead of using the ID tag to find elements it uses the ‘class’ tag.
Lines 67 - 69 are all in the same function, this means that for as long as variable ‘I’ is equal to 0. Then ‘slides.length’ will always be bigger by ‘I’ plus 2. Line 68 closes this variable off by saying if slides is equal to ‘I’ then the display will be turned off. Therefore making this element invisible.
Lines 70 - 74 to finish the JavaScript and end my development diary document. Line 70 sets another variable called ‘slide index’ this is called straight after on line 71, which says that the element ‘slides’ (which is also ‘slideindex’) is bigger than ‘slides.length’ while slide index is equal to 1. To end this whole file off, Lines 72 and 74. Line 72 is saying that ‘slides’ is equal to ‘slide index’ minus 1. This then is saying that it will display as a ‘block’ code. Finally, line 73 - 74 is a small command called ‘settimout’ this small command just gives a slight delay in the function, so when it executes it will take a few more seconds to execute.
Overall Of Development Diary
Overall, I tried to expand on my development diary as much as could from the feedback I got from the resubmission. However, I feel that my time management is a big factor and something which is holding me back from better grades in projects. This is something which I will try and improve on my next project which will mean a lot more to my final grade. I do like some aspects of my development diary, like how much I go into depth about the code which I’m writing, as this shows that I know what I’m talking about and I’m not mindlessly writing lines of text over and over again.
Citations
Niche.com - Massachusetts institute of Technology
Niche.com - Georgia Institute of Technology
WhatUni.com - University of Staffordshire
WhatUni.com - University Of Manchester metropolitan
WhatUni.com - University of Abertay
Studentcrowd.com - University of Abertay
Niche.com - University of Southern California
Niche.com - Rochester Institute
Tripadvisor.com - Rochester Institute of Technology
WhatUni.com - Royal College of Art
Studentcrowd.com - University of The Arts London (UAL)
StudentCrowd.com - Parish Hall West London
Niche.com - Rhode Island School of design
Tripadvisor.com - Rhode Island School of design
Tripadvisor.com - Arts of Paris
WhatUni.com - Bournemouth University
StudentCrowd.com - Bournemouth University
WhatUni.com - University of Falmouth
Niche.com - Sheridan University
StudentCrowd.com - Oxford University
StudentCrowd.com - University of Cambridge
TotalJobs.com - Job Listing #1
Development Diary - Citations